14.6 스레드 동기화(synchronized)
멀티 스레드는 하나의 객체를 공유해서 작업할 수도 있다.
다른 스레드에 의해 객체 내부 데이터가 쉽겨 변경될 수 있기 때문에
의도했던 것과는 다른 결과가 나올 수 있다.
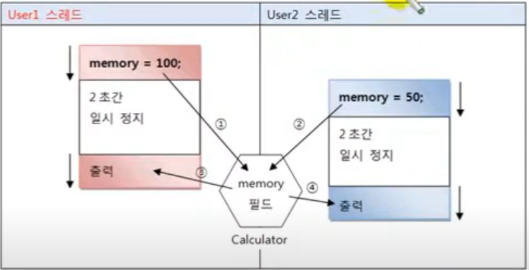
User1 스레드는 Calculator 객체의 memory필드에 100을 먼저 저장하고 2초간 일시 정지 상태.
User2 스레드가 memory필드값을 50으로 변경하고 2초간 일시 정지한다.
이 후 User1의 일시 정지 상태가 풀리고 memory 필드값을 출력하면?
→ User2가 저장한 50이 나온다.
위 결과는 User1 스레드에 저장된 데이터가 날라가버린 경우이다.
이러한 상황을 막을 수 있도록 하는 잠금 기능은?
→ 자바에서 동기화(synchronized) 메소드, 블록을 제공한다.
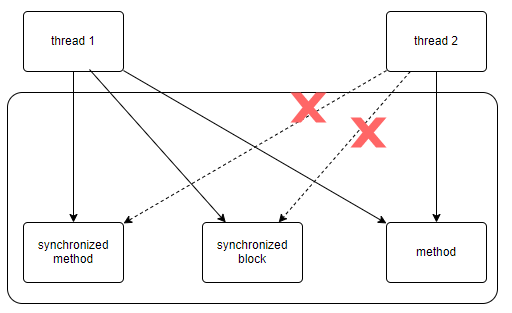
객체 내부에 동기화 메소드와 동기화 블록이 여러 개가 있다면 스레드가 이들 중 하나를 실행할 때 다른 스레드는 해당 메소드는 물론, 다른 동기화 메소드 및 블록도 실행할 수 없다. (일반 메소드는 실행 가능)
● 동기화 메소드를 선언하는 방법
public synchronized void method() {
	// 단 하나의 스레드만 실행하는 영역
}
● 동기화 블록
public void method() {
	// 여러 스레드가 실행할 수 있는 영역
    ...
    synchronized(공유객체) {
    	// 단 하나의 스레드만 실행하는 영역
    }
    // 여러 스레드가 실행할 수 있는 영역
}
이해를 위해 실행 예시를 넣었다.
실행 예시)
public class Calculator {	// 공유 객체
	private int memory;

	public int getMemory() {
		return memory;
	}

	public synchronized void setMemory(int memory) {  // setMemory는 동기화 사용
		this.memory = memory;
		try {
			Thread.sleep(2000);
		} catch (InterruptedException e) {
		}
		System.out.println(Thread.currentThread().getName() + ": " + this.memory);
	}

	public synchronized void setMemory2(int memory) {
		// 다른 필요한 코드가 있을 때 ...
		//
		//
		synchronized(this) {
			this.memory = memory;
			try {
				Thread.sleep(2000);
			} catch (InterruptedException e) {
			}
			System.out.println(Thread.currentThread().getName() + ": " + this.memory);
		}

		// 다른 필요한 코드가 있을 때 ...
		//
		//
	}
}
// User1 스레드
public class User1Thread extends Thread {
	private Calculator calculator;

	public User1Thread() {
		setName("User1Thread");
	}

	public void setCalculator(Calculator calculator) {
		this.calculator = calculator;
	}

	@Override
	public void run() {
		calculator.setMemory(100);
	}
}
// User2 스레드
public class User2Thread extends Thread {
	private Calculator calculator;

	public User2Thread() {
		setName("User2Thread");
	}

	public void setCalculator(Calculator calculator) {
		this.calculator = calculator;
	}

	@Override
	public void run() {
		calculator.setMemory(50);
	}
}

// 실행 클래스
public class SynchronizedExample {

	public static void main(String[] args) {

		// 공유 객체 생성
		Calculator calc = new Calculator();

		// 공유 객체를 User1Thread에 주입
		User1Thread user1 = new User1Thread();
		user1.setCalculator(calc);

		// 공유 객체를 User2Thread에 주입
		User2Thread user2 = new User2Thread();
		user2.setCalculator(calc);

		// User1Thread가 계산기를 먼저 사용,  User2Thread가 계산기를 나중에 사용
		user1.start();
		user2.start();
	}

}
● wait()와 notify()를 이용한 스레드 제어
경우에 따라 두 개의 스레드를 번갈아 가며 정확한 교대 작업이 필요할 경우 이를 활용.
notify() : 일시 정지 상태에 있는 다른 스레드를 실행 대기 상태로 만듦
wait() : 자신의 스레드는 일시 정지 상대로 만듦
예시)
public synchronized void methodA() {
    Thread thread = Thread.currentThread();
    System.out.println(thread.getName() + ": method A 작업 실행 ");
    notify();  // 상대방을 깨운다 (실행대기 상태로 만듦)
    try {
        wait();	// 자신의 스레드를 일시 정지 상태로 만듦
    } catch (InterruptedException e) {
    }	 // 자기 자신은 일시정지
}

public synchronized void methodB() {
    Thread thread = Thread.currentThread();
    System.out.println(thread.getName() + ": method B 작업 실행 ");
    notify();  // 상대방을 깨운다 (실행대기 상태로 만듦)
    try {
        wait(); // 자신의 스레드를 일시 정지 상태로 만듦
    } catch (InterruptedException e) {
    }	 // 자기 자신은 일시정지
}
14.7 스레드 안전 종료
스레드가 불안전하게 종료가 된다면?
→ 데이터 손실, 자원 누수, 응용프로그램의 불안정성, 동기화 문제, 디버깅의 어려움 등..
스레드는 자신의 run() 메소드가 모두 실행되면 자동적으로 종료.
경우에 따라 즉시 종료시킬 필요가 있다.
● 조건 이용 방법
public class PrintThread extends Thread {
	private boolean stop;
	// 외부에서 stop 필드값을 변경 할 수 있도록 세터 선언
	public void setStop(boolean stop) {
		this.stop = stop;
	}

	@Override
	public void run() {
		while(!stop) {  // stop 필드의 값에 따라 반복 결정
			System.out.println("실행 중");
		}
		System.out.println("리소스 정리");
		System.out.println("실행 종료");
	}
}

public class SafeStopExample {
	public static void main(String[] args) {

		PrintThread printThread = new PrintThread();
		printThread.start();  // run() 실행

		try {
			Thread.sleep(3000);
		} catch (InterruptedException e) {
		}
		printThread.setStop(true);  // PrintThread 종료를 위해 stop 필드값 변경
	}
}
● interrupt() 메소드 이용 방법
interrupt() 메소드는 스레드가 일시 정지 상태에 있을 때 InterruptedException 예외를 발생시키는 역할을 함.
public class PrintThread extends Thread {
	@Override
	public void run() {
		try {
			while (true) {
				System.out.println("실행 중");
				Thread.sleep(1);  // 인터럽트 예외가 발생하도록 일시 정지를 만듦.
			}
		} catch (Exception e) {
		}
		System.out.println("리소스 정리");
		System.out.println("실행 종료");
	}
}

public class InterruptExample {
	public static void main(String[] args) {

		PrintThread printThread = new PrintThread();
		printThread.start();

		try {
			Thread.sleep(3000);
		} catch (InterruptedException e) {
		}

		printThread.interrupt();  // InterruptedException 예외 발생 시킴
								  // 반복문을 빠져나올 수 있게 한다.
	}
}
짧은 시간이나마 일시 정지를 위해 Thread.sleep(1)을 사용한 것. (좋은 방법은 아니다)
일시 정지를 만들지 않고도 interrupt() 메소드 호출 여부를 알 수 있는 방법.
Thread의 interrupted()와 isInterrupted() 메소드를 사용
public class PrintThread extends Thread {
	@Override
	public void run() {
		while (true) {
			System.out.println("실행 중");
			if (isInterrupted()) {  // interrupt() 메소드 호출 시 while문 빠져나감
				break;
			}
		}
		System.out.println("리소스 정리");
		System.out.println("실행 종료");
	}
}
위의 PrintThread 코드를 이처럼 바꿔줄 수 있다. 지속적인 일시 정지를 안주어도 되기 때문에 이를 이용하자
14.8 데몬 스레드
데몬(daemon) 스레드 : 주 스레드의 작업을 돕는 보조적인 역할을 수행하는 스레드
(주 스레드가 종료되면 데몬 스레드도 따라서 자동으로 종료)
※ main 스레드가 종료된다고 해도 (데몬 스레드가 아닌) 작업을 수행 중인 다른 스레드는 종료되지 않는다.
// 데몬 스레드로 사용할 AutoSaveThread
public class AutoSaveThread extends Thread {
	public void save() {
		System.out.println("작업 내용을 저장함");
	}

	@Override
	public void run() {
		while(true) {
			save();  // 1초 주기로 작업 수행 save
			try {
				Thread.sleep(1000);
			} catch (InterruptedException e) {
			}
		}
	}
}

public class DaemonExample {
	public static void main(String[] args) {

		AutoSaveThread ast = new AutoSaveThread();
		ast.setDaemon(true);  // AutoSaveThread를 데몬 스레드로 만듦
		ast.start();

		try {
			Thread.sleep(3000);
		} catch (InterruptedException e) {
		}
		System.out.println("메인 스레드 종료");
	}
}
메인 스레드가 종료되면 AutoSaveThread도 따라서 자동 종료된다.
14.9 스레드 풀
채팅, 웹, 네트워크 애플리케이션 서버 등
서버 자체를 만들 때 필요한 내용.
우리 과정에서 생략하고 넘어간다. (따로 배워보자)
15장 컬렉션 자료구조 (중요)
15.1 컬렉션 프레임워크
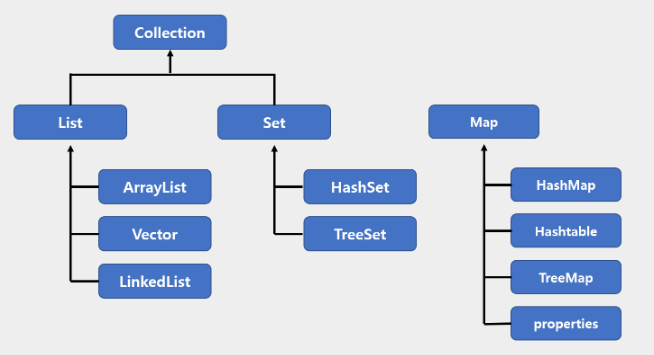
자료구조(Data Structure)를 바탕으로 객체들을 효율적으로 추가, 삭제, 검색할 수 있도록 관련된 인터페이스와 클래스들을 java.util 패키지에 포함시켜 놓은 것.
| 인터페이스 분류 | 특징 | 구현 클래스 | |
| Collection | List | - 순서를 유지하고 저장 - 중복 저장 가능 |
ArrayList, Vector, LinkedList |
| Set | - 순서 없이 저장 - 중복 저장 안됨 |
HashSet, TreeSet | |
| Map | - 키와 값으로 구성된 엔트리 저장 - 키는 중복 안됨 |
HashMap, Hashtable, TreeMap, Properties |
|
15.2 List 컬렉션
객체를 인덱스로 관리.
객체를 저장하면 인덱스가 부여되고 인덱스로 객체를 검색, 삭제할 수 있는 기능을 제공
| 기능 | 메소드 | 설명 |
| 객체 추가 | boolean add(E e) | 주어진 객체를 맨 끝에 추가 |
| void add(int index, E element) | 주어진 인덱스에 객체를 추가 | |
| set(int index, E element) | 주어진 인덱스의 객체를 새로운 객체로 바꿈 | |
| 객체 검색 | boolean contains(Object o) | 주어진 객체가 포함되어있는지 확인 |
| E get(int index) | 주어진 인덱스에 저장된 객체를 리턴 | |
| isEmpty() | 컬렉션이 비어있는지 확인 | |
| int size() | 저장되어 있는 전체 객체 수 리턴 | |
| 객체 삭제 | void clear() | 저장된 모든 객체 삭제 |
| E remove(int index) | 주어진 인덱스에 저장된 객체 삭제 | |
| boolean remove(Object o) | 주어진 객체를 삭제 |
● ArrayList
List 컬렉션에서 가장 많이 사용하는 컬렉션. (내부 배열에 객체가 저장됨)
일반 배열과의 차이점 → 제한 없이 객체를 추가할 수 있다.
※ 초기 생성시 10개가 주어지고, 이를 넘으면 저장공간을 10씩 늘린다.
List<E> list = new ArrayList<>(); // E에 지정된 타입의 객체만 저장
ArrayList 컬렉션에 객체를 추가하면 인덱스 0번부터 차례대로 저장.
특정 인덱스의 객체를 제거하면 바로 뒤 인덱스부터 마지막 인덱스까지 모두 앞으로 1씩 당겨짐.
마찬가지로 특정 인덱스에 객체를 삽입하면 해당 인덱스부터 마지막 인덱스까지 모두 1씩 밀려남.
→ 빈번한 객체 삭제와 삽입이 일어나는 곳에선 ArrayList를 사용하는 것보다 LinkedList를 사용하는 것이 좋다.
ArrayList의 사용법은 책의 예시를 보며 여러 방면에서 사용해보자
● Vector
ArrayList와 동일한 내부 구조를 갖는다.
차이점은 동기화된(synchronized) 메소드로 구성되어 있기 때문에,
멀티 스레드가 동시에 Vector() 메소드를 실행할 수 없다.
따라서 멀티 스레드 환경에서 안전하게 객체를 추가 또는 삭제할 수 있다.
List<E> list = new Vector<>(); // E에 지정된 타입의 객체만 저장
예시) 실행문에서 어떤식으로 사용하는지 보고 이해하기
import java.util.*;

import ch15.sec02.exam01.Board;

public class VectorExample {
	public static void main(String[] args) {
//		List<Board> list = new ArrayList<>();  // ArrayList는 동기화 처리가 안됨
		List<Board> list = new Vector<>();

		// 익명 객체 기법 사용
		Thread threadA = new Thread() {
			@Override
			public void run() {
				for(int i=1; i<=1000; i++) {
					list.add(new Board(i,"제목","내용","글쓴이",new Date()));
				}
			}
		};
		// 익명 객체 기법 사용
		Thread threadB = new Thread() {
			@Override
			public void run() {
				for(int i=1001; i<=2000; i++) {
					list.add(new Board(i,"제목","내용","글쓴이",new Date()));
				}
			}
		};
		threadA.start();  // A 스레드 활성화
		threadB.start();  // B 스레드 활성화

		// main 스레드를 threadA와 threadB가 종료될 때까지 기다리게 함
		try {
			threadA.join();  // A 일시 정지 상태가 됨.
			threadB.join();  // B 일시 정지 상태가 됨.
		} catch (InterruptedException e) {
		}

		int size = list.size();
		System.out.println("총 객체 수: " + size);
	}
}
ArrayList는 두 스레드가 동시에 add() 메소드를 호출할 수 있기 때문에 실행 결과가 2000개가 나오지 않거나 PC에 따라 에러가 날 수 있다.
Vector를 사용하면 한 번에 하나의 스레드만 실행할 수 있기 때문에 실행 결과가 정확히 2000개가 나온다.
● LinkedList
ArrayList와 사용 방법은 동일하지만 내부 구조는 완전히 다름.
LinkedList는 인접 객체를 체인처럼 연결해서 관리한다.
ex) 10000개의 객체를 가지는 ArrayList에서 1개의 객체를 삭제할 경우 나머지 수많은 객체들이 줄줄이 인덱스를 변경하게된다. LinkedList는 인접 객체에 따른 계산만 하기 때문에 이럴 땐 LinkedList가 유리할 수 있다.
List<E> List = new LinkedList<>();
15.3 Set 컬렉션
Set 컬렉션은 저장 순서가 유지되지 않는다. 또한 객체를 중복해서 저장할 수 없고, 하나의 null만 저장할 수 있다.
(수학에서의 집합 개념. 인덱스로 객체를 검색하여 가져오는 메소드가 없다.)
※ Set은 단독으로 잘 사용하지 않음. Map과 같이 쓸 경우 유용
| 기능 | 메소드 | 설명 |
| 객체 추가 | boolean add(E e) | 주어진 객체를 성공적으로 저장하면 true리턴 중복 객체면 false 리턴 |
| 객체 검색 | boolean contains(Object o) | 주어진 객체가 저장되어 있는지 여부 |
| isEmpty() | 컬렉션이 비어 있는지 확인 | |
| Iterator<E> iterator() | 저장된 객체를 한 번씩 가져오는 반복자 리턴 | |
| int size() | 저장되어 있는 전체 객체 수 리턴 | |
| 객체 삭제 | void clear() | 저장된 모든 객체 삭제 |
| boolean remove(Object o) | 주어진 객체 삭제 |
● HashSet
Set 컬렉션 중 가장 많이 사용.
Set<E> set = new HashSet<>(); // E에 지정된 타입의 객체만 저장HashSet은 동일한 객체는 중복 저장하지 않는다.
동일한 객체는 동등 객체를 말함.
다른 객체라도 hashCode() 메소드의 리턴값이 같고, equals() 메소드가 true를 리턴하면 동일한 객체라고 판단하고 중복 저장하지 않는다.
※ Object의 hashCode()는 객체의 번지를 리턴. HashSet의 hashCode()는 Object의 hashCode()를 재정의
→ 문자열을 HashSet에 저장할 경우, 같은 문자열을 갖는 String 객체는 동등한 객체로 간주
→ 교재와 다르게 롬복을 이용하여 예시코드 연습
※ 인덱스로 객체를 검색할 수 없기 때문에 향상된 for문을 이용하거나 Set 컬렉션의 iterator() 메소드로 반복자를 얻어 객체를 하니씩 가져온다.
예시) 향상된 for문
Set<E> set = new HashSet<>();
for(E e : set) {
	...
}
예시) 이터레이터 이용
Set<E> set = new HashSet<>();
Iterator<E> iterator = set.iterator();
이터레이터는 Set 컬렉션의 객체를 가져오거나 제거하기 위해 메소드를 제공한다.
| 리턴 타입 | 메소드명 | 설명 |
| boolean | hasNext() | 가져올 객체가 있으면 true 리턴. 없으면 false 리턴 |
| E | next() | 컬렉션에서 하나의 객체를 가져옴 |
| void | remove() | next()로 가져온 객체를 Set 컬렉션에서 제거 |
while(iterator.hasNext()) {
	E e = iterator.next();
}'JAVA' 카테고리의 다른 글
| 18일차 2024 - 3 - 21 (0) | 2024.03.21 |
|---|---|
| 17일차 2024 - 3 - 20 (0) | 2024.03.20 |
| 5일차 2024 - 3 - 4 (0) | 2024.03.18 |
| 4일차 2024 - 2 - 29 (0) | 2024.03.18 |
| 15일차 2024 - 3 - 18 (0) | 2024.03.18 |