ppt
40p 부터 시작
● Model 객체 사용법
Model 객체를 파라미터로 받아서 데이터를 뷰로 넘길 수 있다.
@RequestMapping("/view")
public String view(Model model) {
    // 데이터만 설정이 가능
    model.addAttribute("id", "hongKu");
    return "board/view";
}
model.addAttribute("변수 이름", "변수에 넣을 데이터 값");이렇게 스프링은 그 값을 뷰쪽으로 넘겨준다.
${ 변수이름 }
→ 뷰(.jsp 파일)에서는 ${ }를 이용하여 값을 가져온다.
ex) 당신의 ID는 ${id}입니다.
● ModelAndView 객체 사용법
Model 객체와 크게 다르지 않다.
@RequestMapping("/content")
public ModelAndView content() {
    // 데이터와 뷰를 동시에 설정이 가능

    // ModelAndView 객체를 선언 및 생성
    ModelAndView mv = new ModelAndView();
    // setViewName("뷰의 경로")
    mv.setViewName("/content"); // 뷰의 이름
    // addObject("변수 이름", "데이터 값")
    mv.addObject("data", "12341234"); // 뷰로 보낼 데이터 값

    return mv;
}
→ jsp도 똑같이 ${ }를 이용한다.
ch02 컨트롤러 코드 실습 모델앤뷰
요즘 모델앤뷰는 거의 쓰지 않는다. 그래도 알고는 있어야 한다.
★ HttpServletRequest & HttpServletResponse
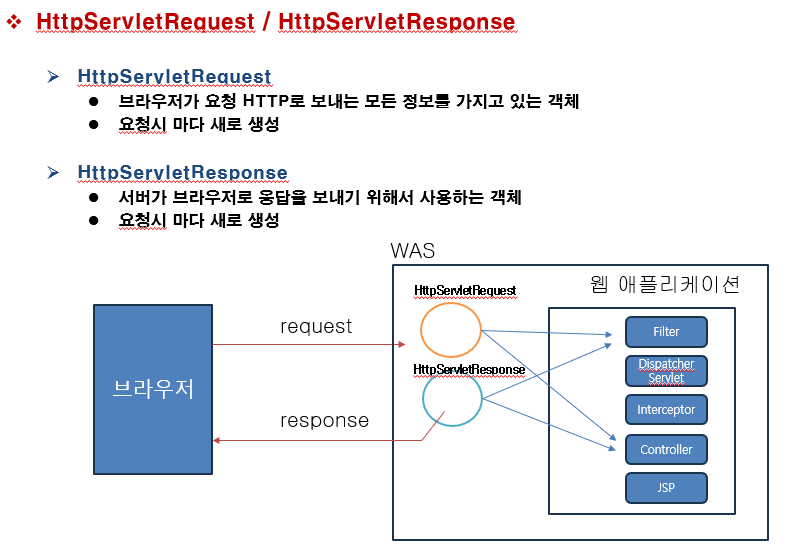
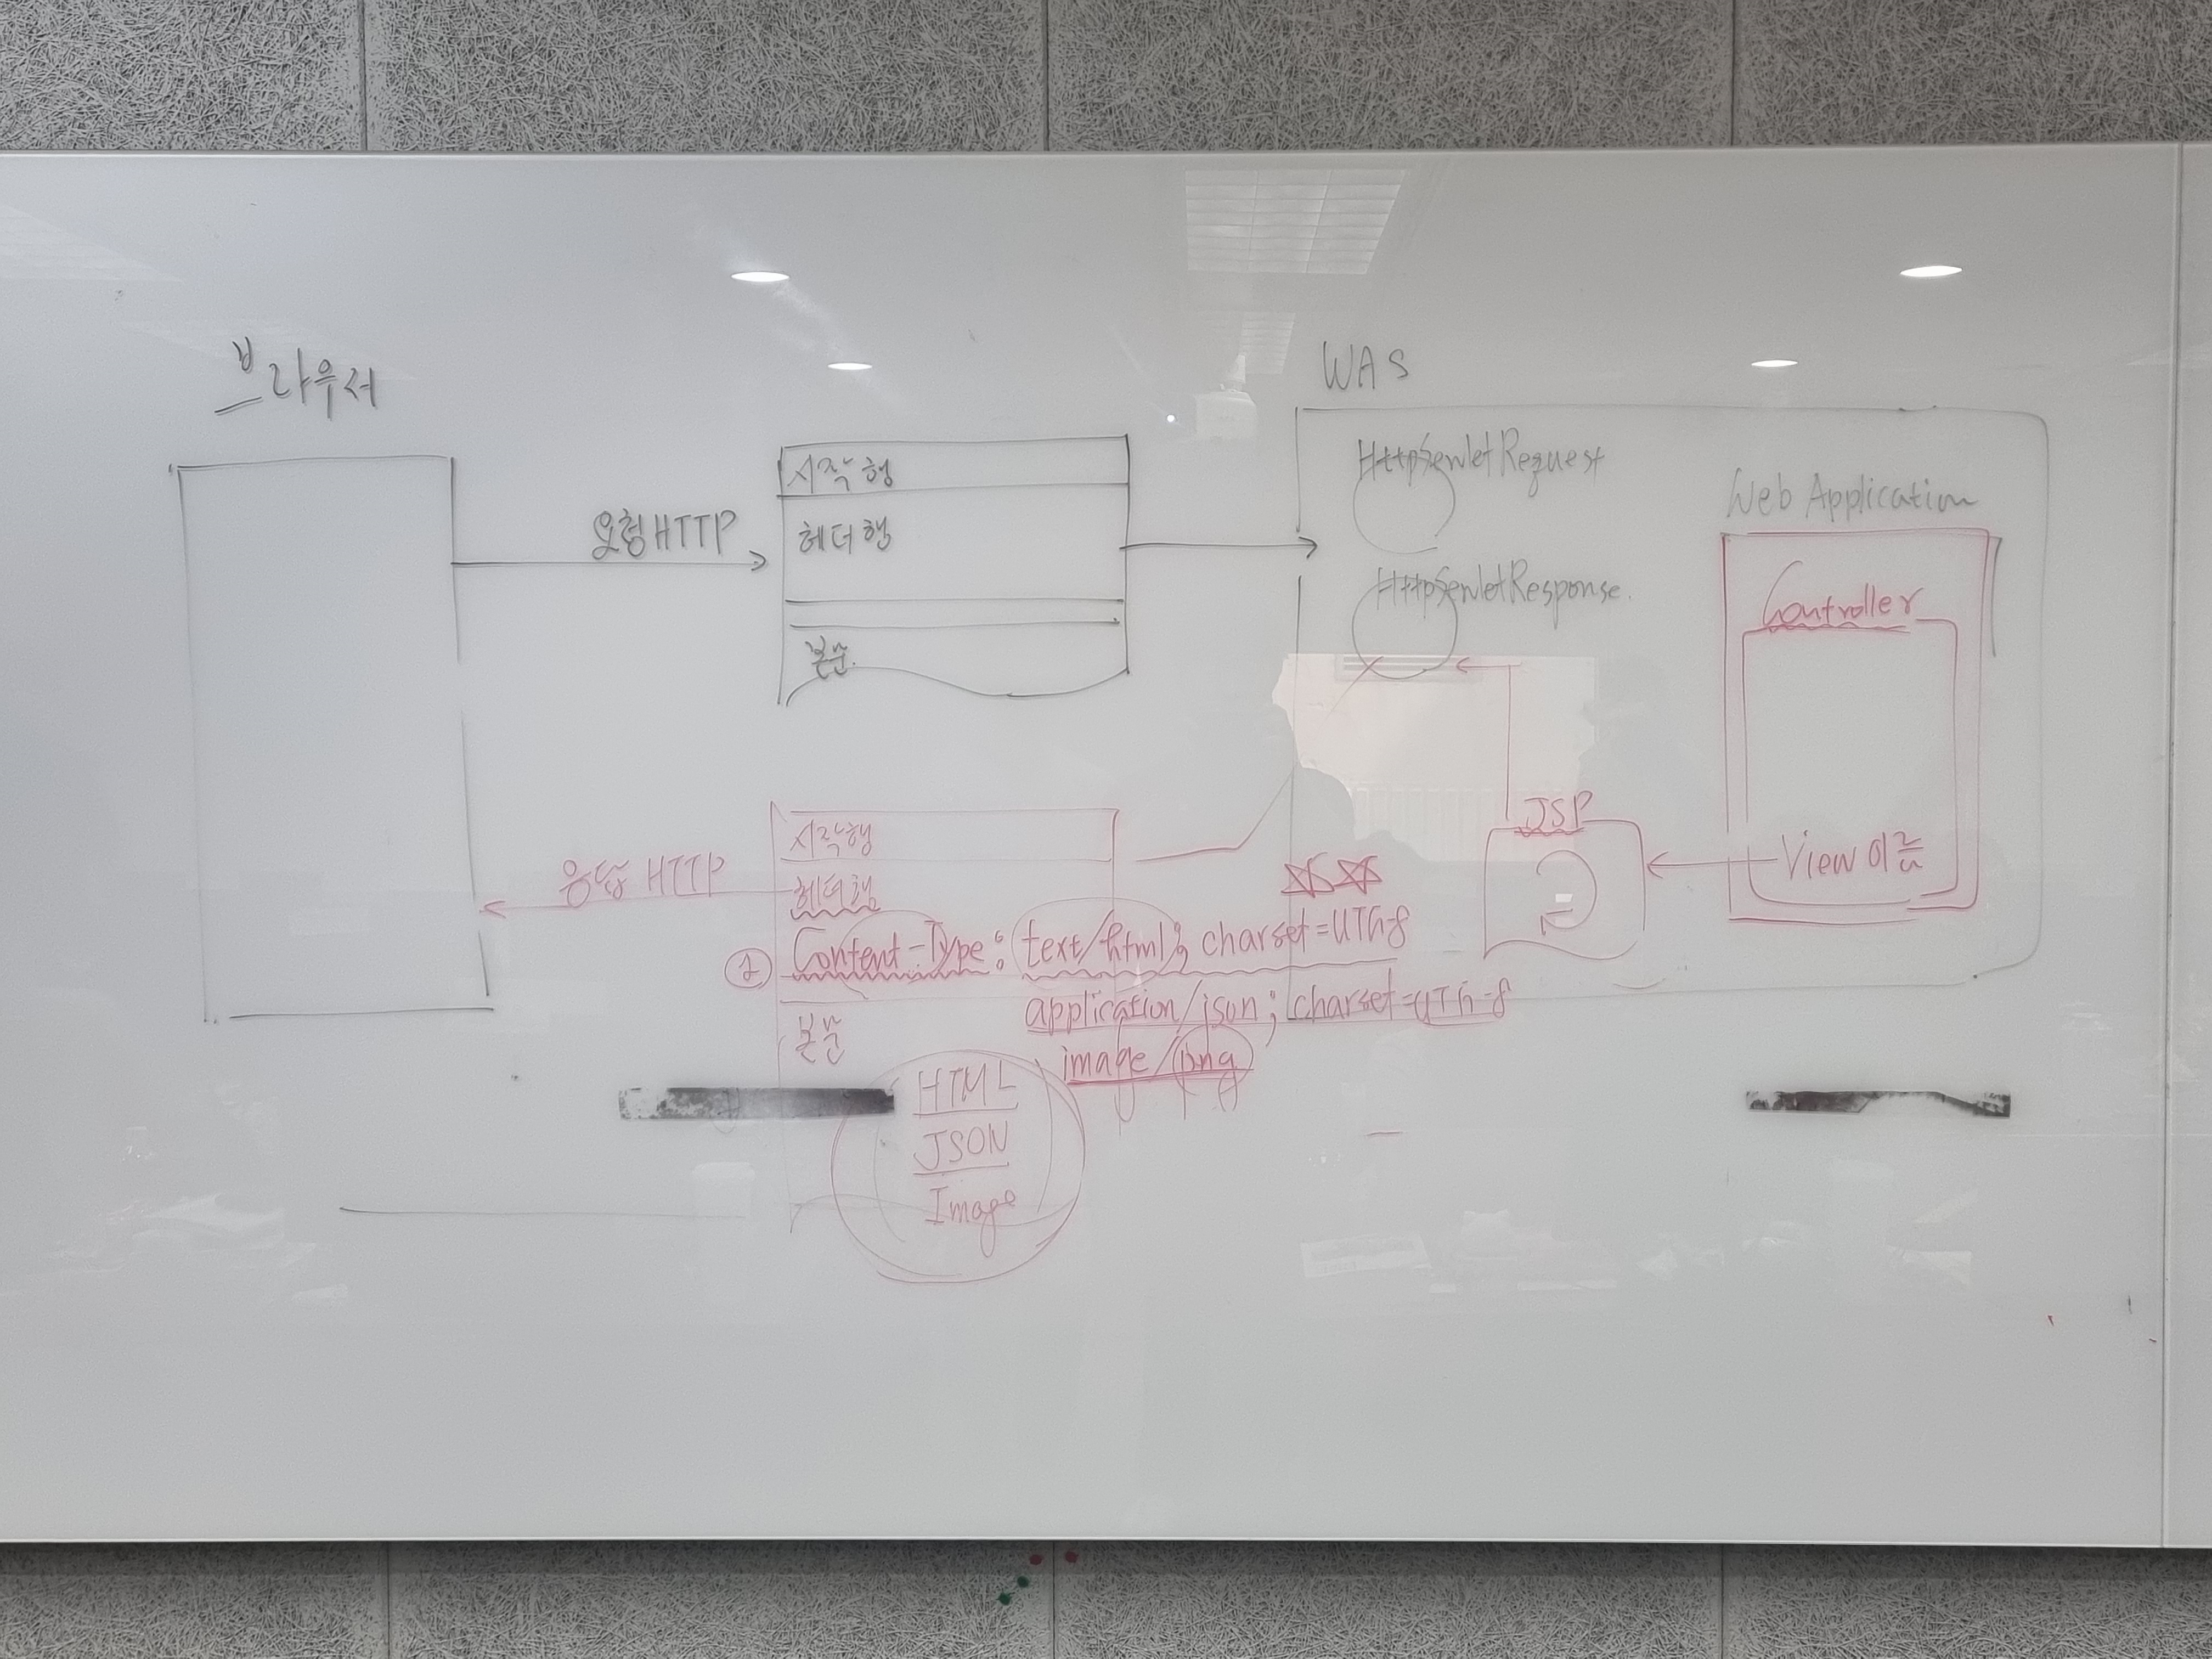
응답 HTTP 에서 브라우저는 가장먼저 헤더행에 있는
1. Content-Type : text/html; charset=UTF-8 이부분을 읽는다.
형식이 무엇인지 확인하는 것이다!
→ 이 리스펀스의 예로 jsp파일 맨위의 content타입이 써져있는 것을 확인할 수 있다.
<%-- page 지시자: page 서버(was)에서 JSP를 해석하는 방법을 기술 --%>
<%@ page language="java" contentType="text/html; charset=UTF-8"
    pageEncoding="UTF-8"%>
2. 본문의 내용을 읽어옴 (화면에 렌더링)
일반적으로 본문의 내용은 양이 많기 때문에 출력 스트림을 통해서 본문의 데이터를 실어준다.
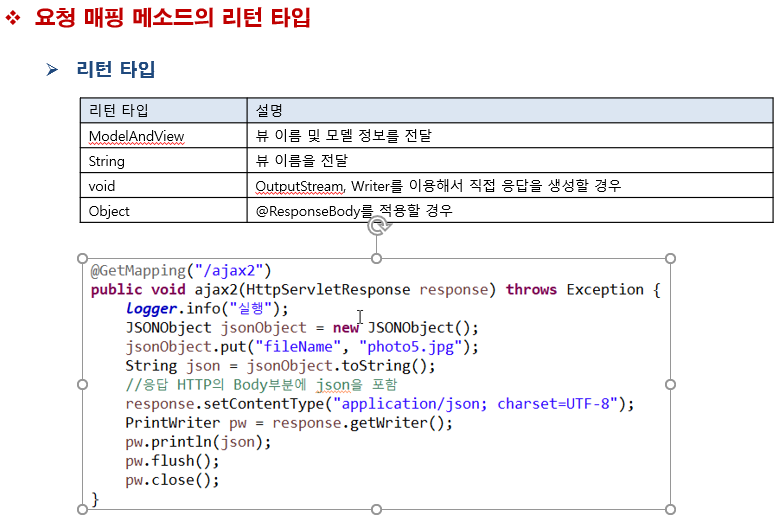
컨트롤러를 이용하여 이미지를 다운받아 봄.
@GetMapping("/voidReturn")
public void imageDownload(HttpServletRequest request, HttpServletResponse response) throws IOException {
	// 다운로드할 이미지 파일 선택
	String fileName = "photo1.jpg";

	// 실제 파일의 경로 얻기
	String filePath = "/resources/image/photos/photo1.jpg";
	String fileSystemPath = request.getServletContext().getRealPath(filePath);
	log.info("fileSystemPath:" + fileSystemPath);

	// 파일의 MIME 타입 얻기
	String mimeType = request.getServletContext().getMimeType(fileName);
	log.info("mimeType:" + mimeType);

	// 파일 데이터를 읽는 입력 스트림을 얻기
	InputStream is = new FileInputStream(fileSystemPath);

	// 응답 헤더에 Content-Type 값을 지정(image/jpeg)
//		response.setContentType("image/jpeg");
	response.setContentType(mimeType);

	// 응답 본문에 출력하는 출력 스트림을 얻기
	OutputStream os = response.getOutputStream();

	// 응답 본문에 데이터 싣기
	// 입력 스트림에서 데이터를 읽고 -> 출력 스트림으로 데이터를 쓰기

	// 방법 1
	/*byte[] bytes = new byte[1024];
	while(true) {
		int readNum = is.read(bytes); // 읽은 바이트 수가 리턴됨
		if(readNum == -1) break;
		os.write(bytes, 0, readNum);
	}
	os.flush();
	is.close();
	os.close();*/

	// 방법 2
	FileCopyUtils.copy(is, os);


	os.flush();
	is.close();
	os.close();

}
public void imageDownload
(http://localhost:8080/springframework/ch02/voidReturn?chNum=ch02)
※ 프로젝트 폴더를 어떻게 구성할 것인지 생각해보자.
프로젝트 http://m.mycompany.xxxx 패키지 아래에
ex)
controller
dao
service
- member
controller
dao
service
- product
controller
dao
service
- order
web.xml 에서 welcom-file-list 지우기 spring과는 관련 없다.
display-name → 패키지 익스플로러에 프로젝트 이름 표시해주는 역할..
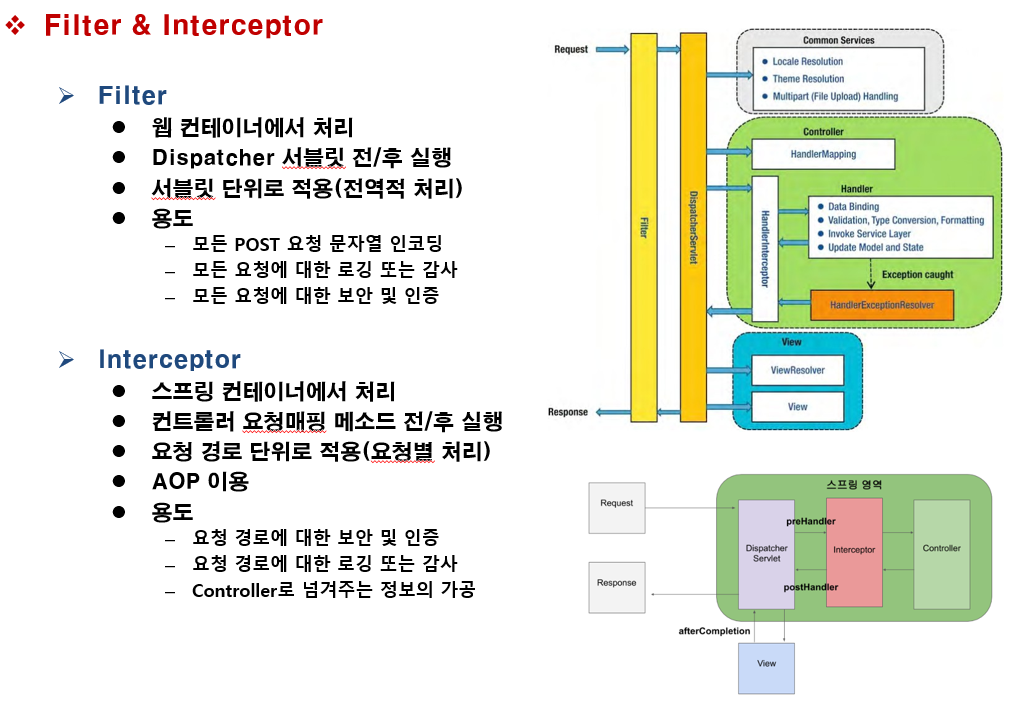
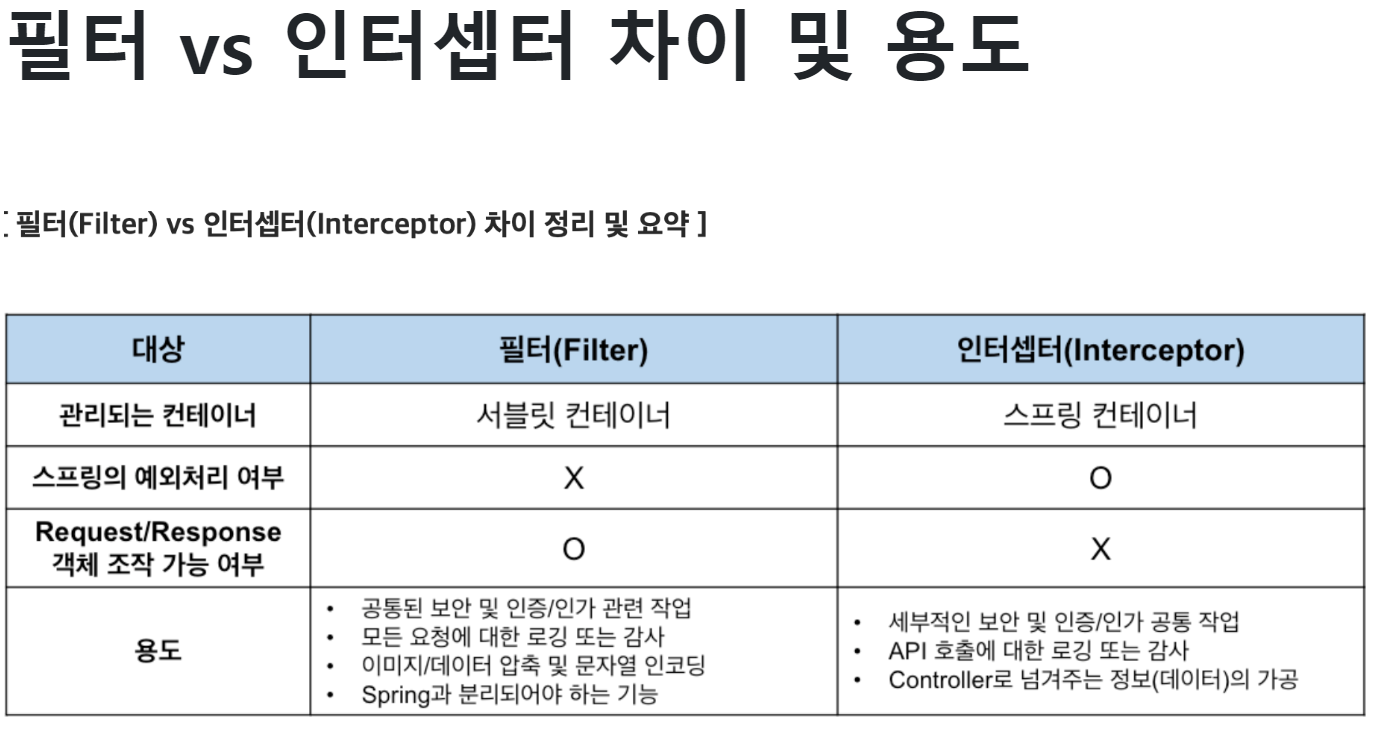
# 필터가 하는 역할
필터 패키지와 클래스를 만들어서 실행
(공부)
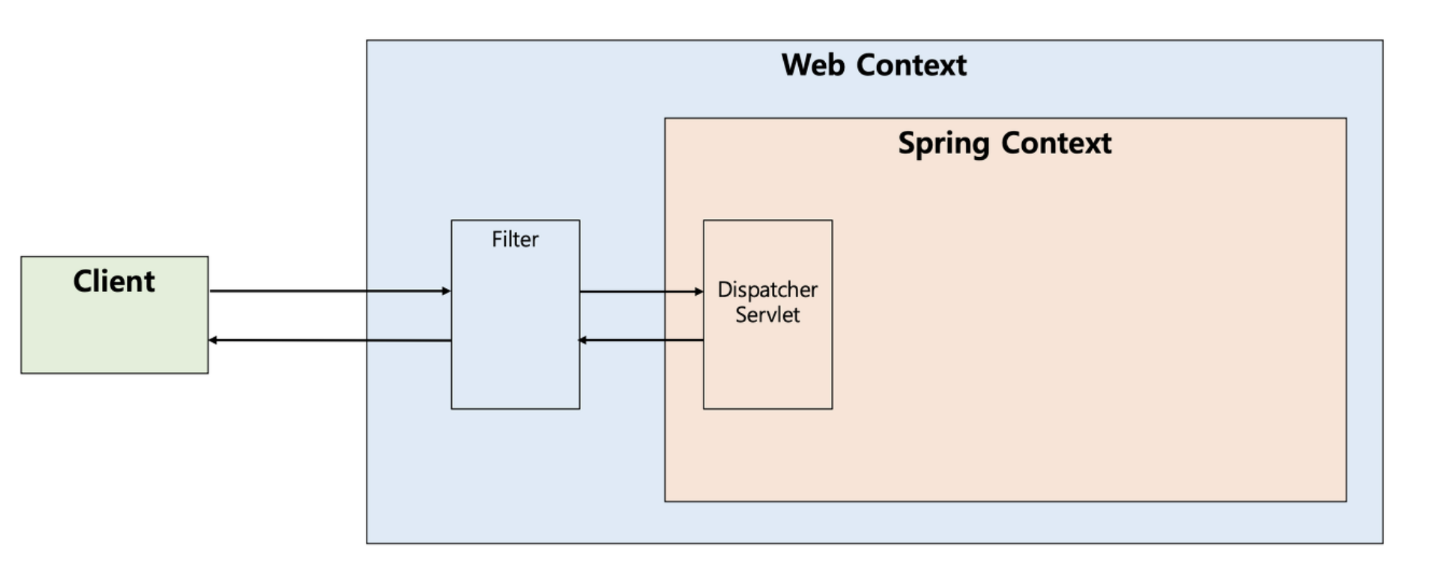
필터는 디스패처 서블릿에 요청이 전달되기 전/후에 url 패턴에 맞는 모든 요청에 대해 부가작업을 처리할 수 있는 기능을 제공
디스패처 서블릿은 스프링의 가장 앞단에 존재하는 프론트 컨트롤러이므로, 필터는 스프링 범위 밖에서 처리가 되는 것
즉, 스프링 컨테이너가 아닌 톰캣과 같은 웹 컨테이너에 의해 관리가 되는 것이고, 디스패치 서블릿 전/후에 처리하는 것
<filter>
    <filter-name>Ch02Filter</filter-name>
    <filter-class>com.mycompany.springframework.filter.Ch02Filter</filter-class>
</filter>
<filter-mapping>
    <filter-name>Ch02Filter</filter-name>
    <url-pattern>/ch02/*</url-pattern>
</filter-mapping>
→ web.xml 파일에 위의 코드를 추가함으로써 ch02실행마다 콘솔 출력
p42
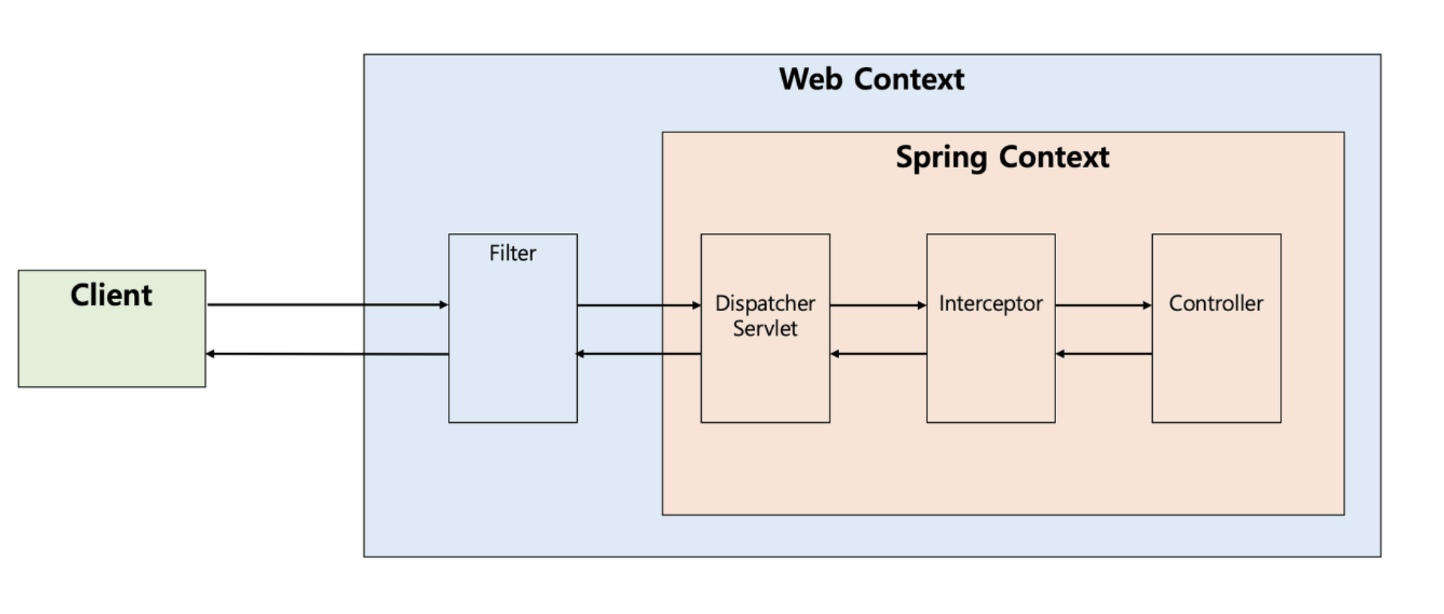
# 인터셉터란?
인터셉터는 필터와 달리, Spring이 제공하는 기술로써, 디스패처 서블릿이 컨트롤러를 호출하기전 과 후에 요청과 응답을 참조하거나 가공할 수 있는 기능을 제공
디스패처 서블릿은 핸들러 매핑을 통해 적절한 컨트롤러를 찾도록 요청하는데, 그 결과로 실행체인(HandlerExecutionChain)을 돌려준다.
그래서 이 실행 체인은 1개 이상의 인터셉터가 등록되어 있다면, 순차적으로 인터셉터들을 거쳐 컨트롤러가 실행되도록하고, 업다면 바로 컨트롤러를 실행한다.
p47 --> 인터셉터 등록하는 방법
스프링 설정파일 src/main/resources
Ch02interceptor.java 생성
디스패처 폴더에 Interceptor파일 생성
view폴더 아래의
menu, obejctReturn, testAuthInterceptor1, testAuthInterceptor2를 사용
postHandle과 afterCompletion은 잘 사용하지 않는다.
인터셉터는 디스패쳐에서 설정해주어야한다.
안먹힐 때 Maven update project 해준다. (설정을 바꾸어주는 것이기 때문..)
Ch02Authinterceptor.java 생성
컨트롤러에
@GetMapping("/testAuthInterceptor1")
public String testAuthInterceptor1() {
log.info("testAuthInterceptor1() 실행");
return "ch02/testAuthInterceptor1";
}
@GetMapping("/testAuthInterceptor2")
@Auth
public String testAuthInterceptor2() {
log.info("testAuthInterceptor2() 실행");
return "ch02/testAuthInterceptor2";
}
생성
@Auth --> 우리가 만들어서 사용 (인증/검증)
만드는 방법은 우리 자바책에 있는데, 배우지 않았다.
인터셉터 폴더에 만들어본다.
new -> 어노테이션 파일 생성.

'JAVA' 카테고리의 다른 글
| 36일차 2024-04-17 (0) | 2024.04.17 |
|---|---|
| 34일차 2024-4-15 (0) | 2024.04.15 |
| 32일차 2024 - 4 - 11 (0) | 2024.04.11 |
| 31일차 2024 - 4 - 9 (0) | 2024.04.09 |
| 30일차 2024 - 4 - 8 (0) | 2024.04.08 |