교수님 공유폴더 이용 잘하자.
AppMune.vue 컴포넌트 생성
<template>
    <div class="accordion" id="accordionExample">
        <div class="accordion-item">
            <h2 class="accordion-header">
                <button class="accordion-button fw-bold" type="button" data-bs-toggle="collapse"
                    data-bs-target="#collapse1" aria-expanded="true" aria-controls="collapse1">
                    Ch01. Vue 시작
                </button>
            </h2>
            <div id="collapseOne" class="accordion-collapse collapse show" data-bs-parent="#accordionExample">
                <div class="accordion-body">
                    <ul class="nav nav-underline flex-column">
                        <li class="nav-item">
                            <RouterLink to="/" class="nav-link">Home</RouterLink>
                        </li>
                    </ul>
                </div>
            </div>
        </div>
    </div>
</template>

<script setup>

</script>

<style scoped></style>
App.vue 코드 수정
<template>
  <div class="d-flex flex-column vh-100">
    <AppHeader />
    <div class="flex-grow-1 container-fluid">
      <div class="row h-100">
        <div class="col-md-6 col-lg-4 bg-dark px-2">
          <div class=" h-100 d-flex flex-column">
            <div class="flex-grow-1 mb-3" style="height:0px; overflow-y:auto; overflow-x:hidden;">
              <AppMenu />
            </div>
          </div>
        </div>

        <div class="col-md-6 col-lg-8 bg-dark px-2 ">
          <div class=" h-100 d-flex flex-column">
            <div class="flex-grow-1 overflow-auto" style="height:0px">
              <router-view />
            </div>
          </div>
        </div>
      </div>
    </div>
  </div>
</template>

<script setup>
import AppHeader from '@/components/AppHeader.vue'; // 상대경로 쓰기싫으면 @ 사용 // @는 src를 나타낸다.
import AppMenu from '@/components/AppMenu.vue';
</script>

<style>
nav {
  padding: 30px;
}

nav a {
  font-weight: bold;
  color: #2c3e50;
}

nav a.router-link-exact-active {
  color: #b942b3;
}
</style>
overflow-y, -x : auto --> 해당 영역을 넘어가게 되면 스크롤이 생기면 자동으로 확장된다.
** <router-view /> 는 router 폴더아래 index.js에서 ' / '에 매핑되는 정보의 컴포넌트를 불러온다고 보면 된다.
큰 컴포넌트 아래에 작은 컴포넌트들이 지속적으로 추가될 수 있다.

이렇게 나뉜다.
App.vue / AppHeader.vue /
설정 해보자.
vue.config.js 파일에서 수정
const { defineConfig } = require('@vue/cli-service')
const webpack = require('webpack');

module.exports = defineConfig({ // 자바스크립트 객체
  transpileDependencies: true,
  devServer: {port:8080},
  configureWebpack : {
    plugins: [
      new webpack.DefinePlugin({
        __VUE_OPTIONS_API__: 'true',
        __VUE_PROD_DEVTOOLS__: 'false',
        __VUE_PROD_HYDRATION_MISMATCH_DETAILS__: 'false'
      })
    ]
  }
});
# webpack에 대한 개념 다시 보자. ppt 16p
__VUE_PROD_HYDRATION_MISMATCH_DETAILS__: 'false' 이 문장으로 인해 검사기에 나오지 않게 된다(콘솔창)
2장 컴포넌트 & 라우팅
router / index.js 수정
import { createRouter, createWebHistory } from 'vue-router'
import HomeView from '../views/HomeView.vue'
import AboutView from '../views/AboutView.vue'

const routes = [
  {
    path: '/',
    name: 'home',
    component: HomeView
  }
]

const router = createRouter({
  history: createWebHistory(process.env.BASE_URL), //히스토리 (뒤로가기 가능)
  routes
})

export default router
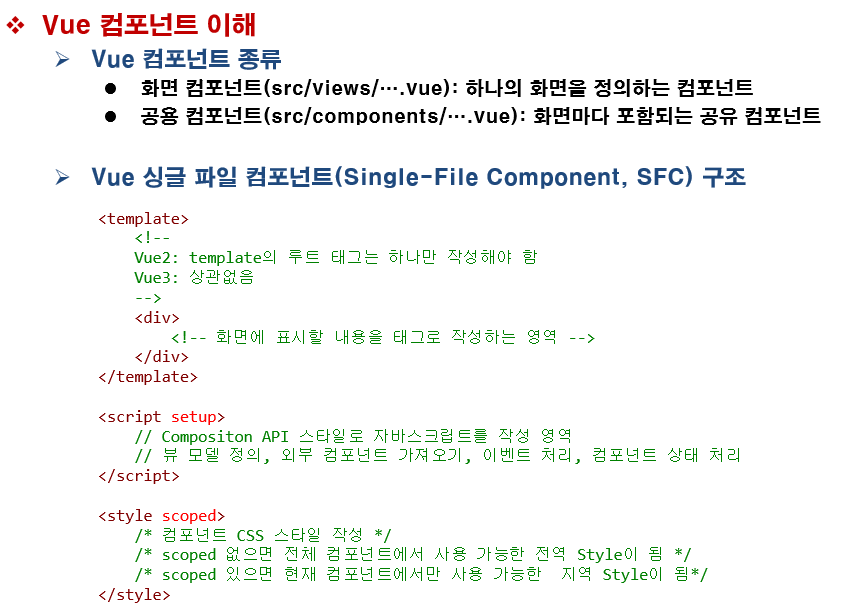
Vue 싱글 파일은 template, script, style로 구성.
Vue2에서는 template가 하나만 들어가야만 했다.
Vue3에서는 template가 여러개 들어갈 수 있지만, 이런 경우가 거의 없다.
어제 강의에서 했었던 부분이 있다.
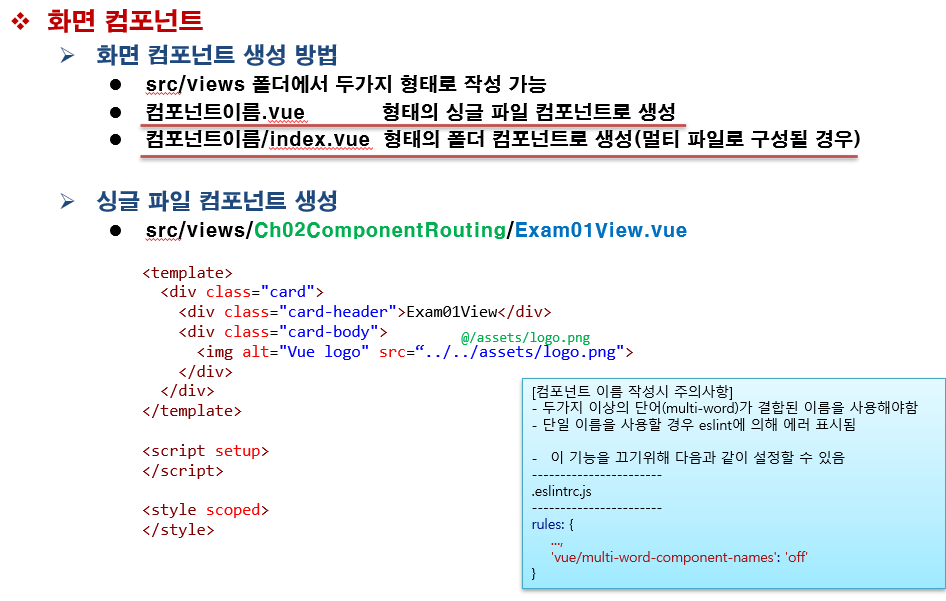
컴포넌트이름.vue로 컴포넌트 폴더 아래에 만들 수 있고,
폴더를 만들어 컴포넌트/index.vue를 만들어서 사용할 때 어떻게 import해오는지.
그리고 단일파일의 네임에 관한 내용들. (단어 하나는 에러, 단어 두개를 합친 이름으로 만들기.. 에러처리)
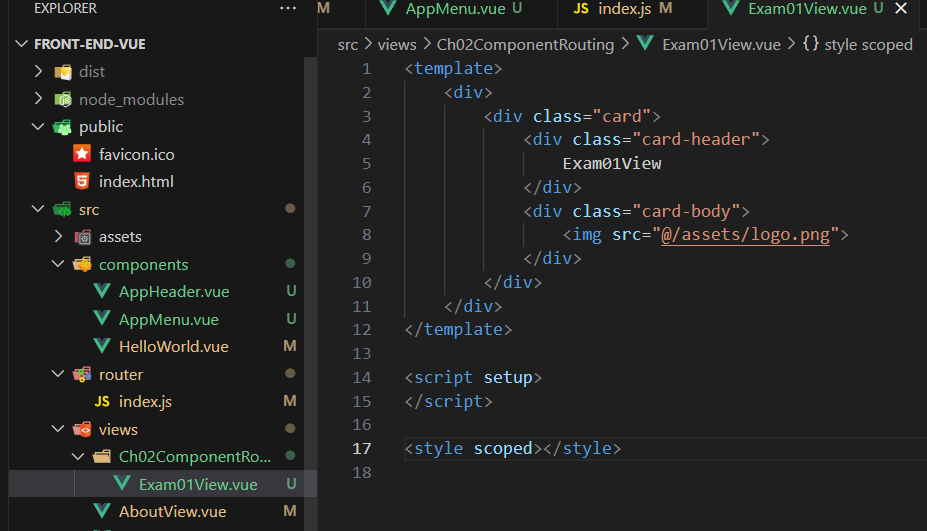
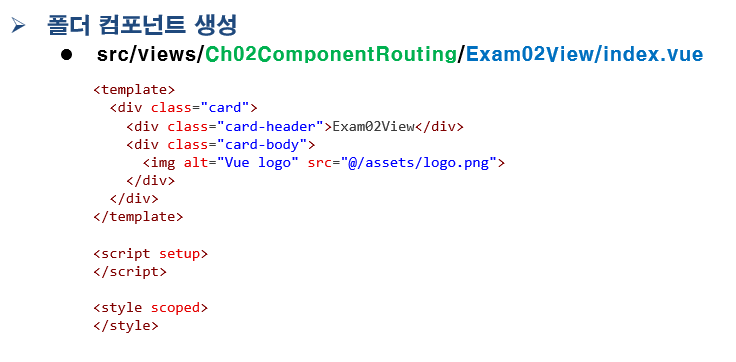
폴더 생성 및 파일만들고 코드 추가
<template>
    <div>
        <div class="card">
            <div class="card-header">
                Exam01View
            </div>
            <div class="card-body">
                <img src="@/assets/logo.png">
            </div>
        </div>
    </div>
</template>

<script setup>
</script>

<style scoped></style>
*라우터로 가서 코드 추가하기
import { createRouter, createWebHistory } from 'vue-router'
import HomeView from '../views/HomeView.vue'
import AboutView from '../views/AboutView.vue'
import Exam01View from '@/views/Ch02ComponentRouting/Exam01View.vue'

const routes = [
  {
    path: '/',
    name: 'home',
    component: HomeView
  },
  {
    path: '/Ch02ComponentRouting/Exam01View',
    component: Exam01View
  }
]

const router = createRouter({
  history: createWebHistory(process.env.BASE_URL), //히스토리 (뒤로가기 가능)
  routes
})

export default router
*AppMenu.vue에 코드 추가하기
<template>
    <div class="accordion" id="accordionExample">
        <!-- 1 -->
        <div class="accordion-item">
            <h2 class="accordion-header">
                <button class="accordion-button fw-bold" type="button" data-bs-toggle="collapse"
                    data-bs-target="#collapse1" aria-expanded="true" aria-controls="collapse1">
                    Ch01. Vue 시작
                </button>
            </h2>
            <div id="collapse1" class="accordion-collapse collapse show" data-bs-parent="#accordionExample">
                <div class="accordion-body">
                    <ul class="nav nav-underline flex-column">
                        <li class="nav-item">
                            <RouterLink to="/" class="nav-link">Home</RouterLink>
                        </li>
                    </ul>
                </div>
            </div>
        </div>
        <!-- 2 -->
        <div class="accordion-item">
            <h2 class="accordion-header">
                <button class="accordion-button fw-bold" type="button" data-bs-toggle="collapse"
                    data-bs-target="#collapse2" aria-expanded="true" aria-controls="collapse2">
                    Ch02. Component & Routing
                </button>
            </h2>
            <div id="collapse2" class="accordion-collapse collapse" data-bs-parent="#accordionExample">
                <div class="accordion-body">
                    <ul class="nav nav-underline flex-column">
                        <li class="nav-item">
                            <RouterLink to="/Ch02ComponentRouting/Exam01View" class="nav-link">Exam01View : 뷰
                                컴포넌트(싱글파일로)</RouterLink>
                        </li>
                    </ul>
                </div>
            </div>
        </div>
    </div>
</template>

<script setup>

</script>

<style scoped></style>
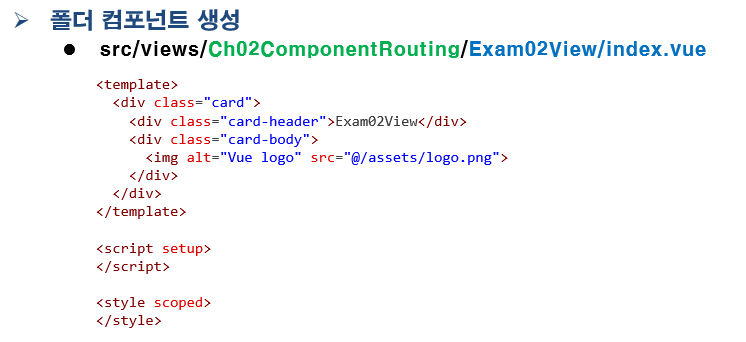
폴더를 생성하여 index.vue를 만들어보자.
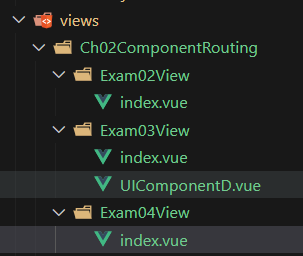
views / Ch02ComponentRouting - Exam02View 폴더 생성하고 index.vue 파일 만들기
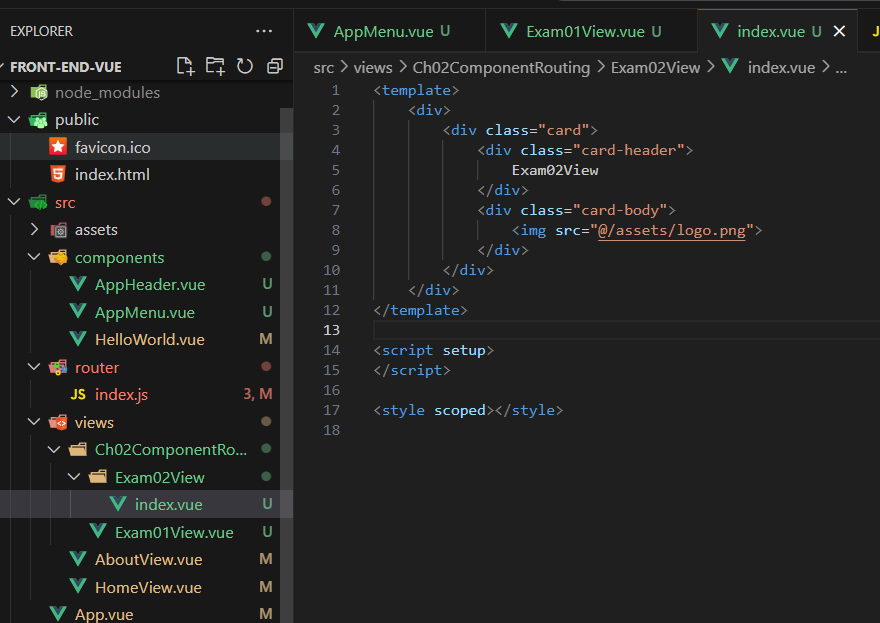
# 폴더형 컴포넌트를 언제 생성할까?
폴더형으로 만들고 서브 컴포넌트가 필요로 할때??
# src / components 폴더에 들어있는 컴포넌트들은 프로젝트 Veiws에서 공통적으로 사용되는 컴포넌트들을 모아놓는다.
# 경우에 따라서 어떤 페이지의 안에서만 쓰는 컴포넌트는 폴더형 컴포넌트를 만들고 그안에 만들어서 사용한다!
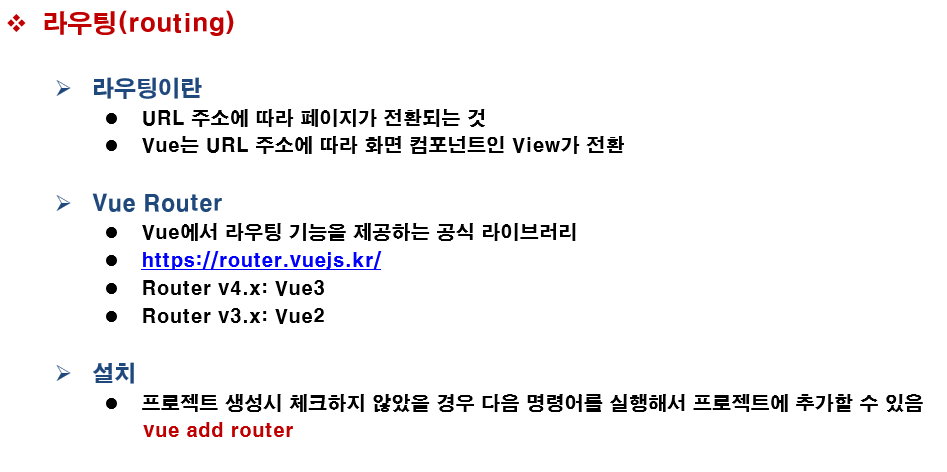
우리가 쓰는 라이브러리는 버전 4이다.
현재 우리는 설치 부분에 있어서 vue add router를 따로 해줄 필요가 없다.
**처음 Vue를 설치할 때 라우터부분에 있어서 체크를 했기 때문
ppt 22p에서 Manually select features -> Router를 추가했다. (이를 체크 안했을 시 위 그림처럼 터미널에서 설치를 진행해주면 된다.
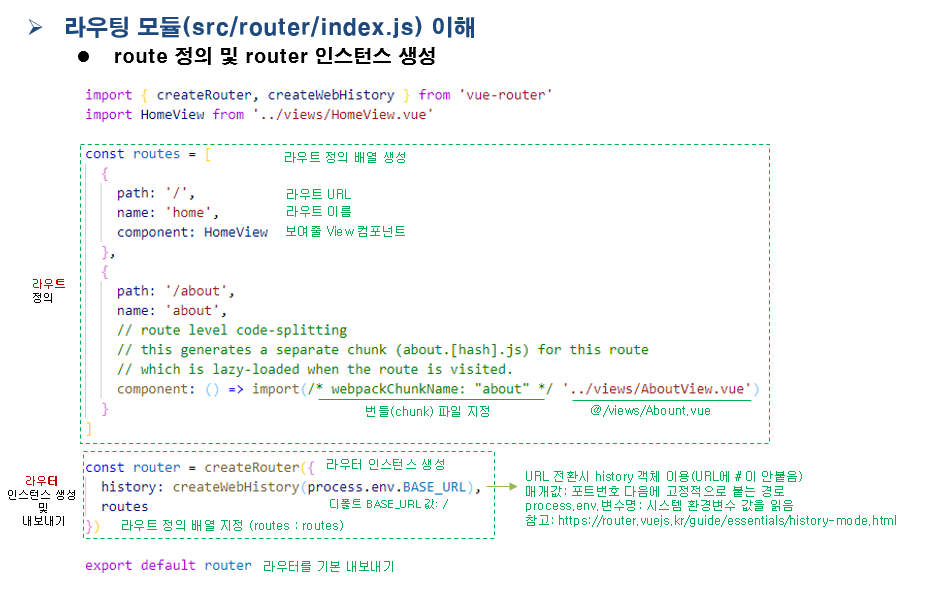
http://localhost:8080/A 또는 http://localhost:8080/B 는 전통적인 URL이동이다.
우리가 현재 컴포넌트로 이동을 하게되면
http://localhost:8080#A 또는 http://localhost:8080#A 으로 바뀌는게 되는데
process.env.BASE_ULR --> 이구문으로 인해 전통적인 URL 방식으로 보이게끔 해준다.
이렇게 라우팅 모듈 설정을 하고 난 뒤에 main.js에서 import하고 이것을 App.vue에서 사용하겠다고 명시한 상태이다.
# 웹팩 : 우리가 정의한 파일들을 하나의 자바스크립트 파일로 합쳐주는(번들) 역할을 한다.
※ routes 부분에는 모든 컴포넌트들이 모이게 되는데, 사용자들이 과연 다 사용하지는 않을 것이다.
따라서 사용자들이 자주 사용하는 페이지 컴포넌트들을 골라 먼저 보내고, 나중에 잘 사용하지 않았던 페이지들은 웹팩을 이용하여 자바스크립트를 모아서 보내주자. (???)
# 라우터 폴더에서 index.js 코드 수정
import { createRouter, createWebHistory } from 'vue-router'
import HomeView from '../views/HomeView.vue'
import AboutView from '../views/AboutView.vue'
import Exam01View from '@/views/Ch02ComponentRouting/Exam01View.vue'
import Exam02View from '@/views/Ch02ComponentRouting/Exam02View'

const routes = [
  {
    path: '/',
    name: 'home',
    component: HomeView
  },
  {
    path: '/Ch02ComponentRouting/Exam01View',
    component: Exam01View
  },
  {
    path: '/Ch02ComponentRouting/Exam02View',
    // component: Exam02View
    component: () => import(/* webpackChunkName: "exam02view" */ '@/views/Ch02ComponentRouting/Exam02View')
  }
]

const router = createRouter({
  history: createWebHistory(process.env.BASE_URL), //히스토리 (뒤로가기 가능)
  routes
})

export default router
*component: () => import(/* webpackChunkName: "exam02view" */ '@/views/Ch02ComponentRouting/Exam02View')
: 사용자가 이 요청을 했을 때, 그 순간에 import하여 다운로드 하는 방식으로 UI를 보여준다.
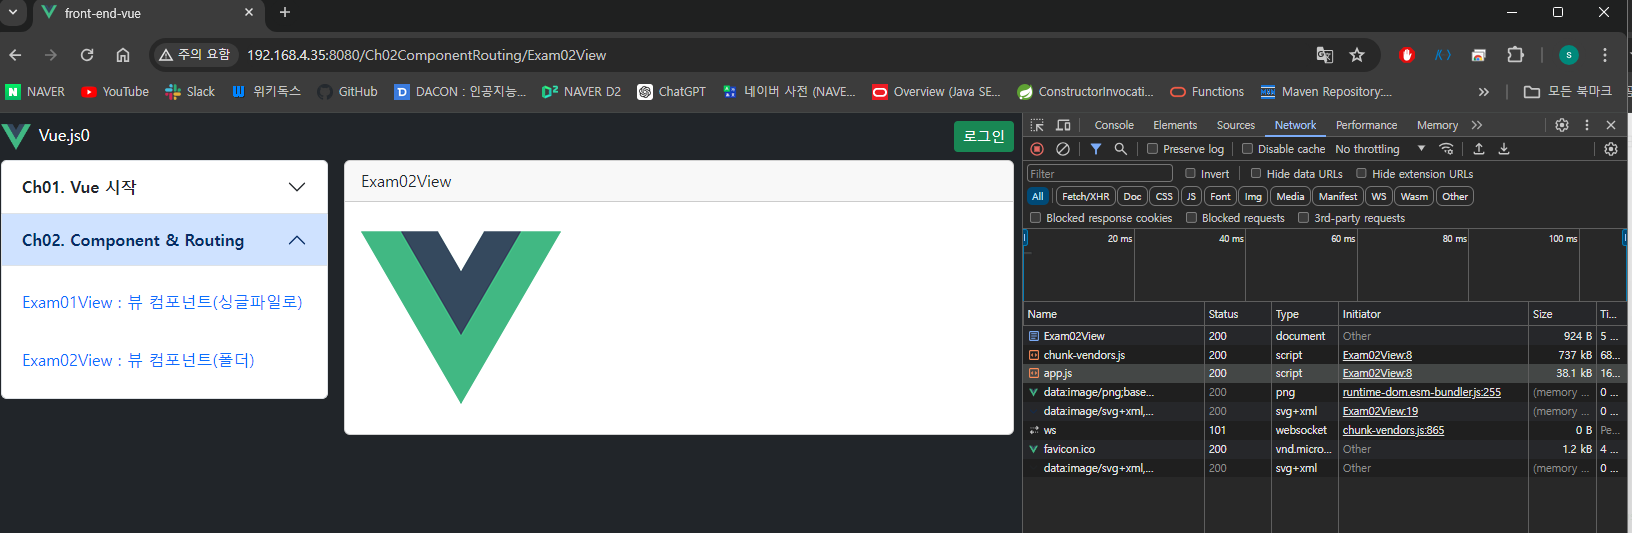
# 확인해보자
1. 소스코드를 수정한 뒤 서버를 끈다.
2. 인터넷기록 삭제 후 다시 서버를 켜보자.
3. Exam02View를 누르게 되면 그 때 검사기의 네트워크에서 자바스크립트가 다운되는 것을 볼 수 있다.
{
path: '/Ch02ComponentRouting/Exam02View',
// component: Exam02View
component: () => import(/* webpackChunkName: "exam02view" */ '@/views/Ch02ComponentRouting/Exam02View')
}
이 부분에서
만약에 3페이지부터 40페이지까지 밀접한 관계를 갖는 페이지라 한다면
웹펙을 이용하여 통째로 다운로드 할 수 있다.

# 공용적으로 사용하는 UI 컴포넌트는 src/components 폴더에 생성하자.
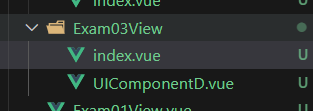
# 일부 관계에 해당하는 UI 컴포넌트는 폴더를 만들어 그 안에서 그와 관련된 여러개의 컴포넌트를 작성하자.
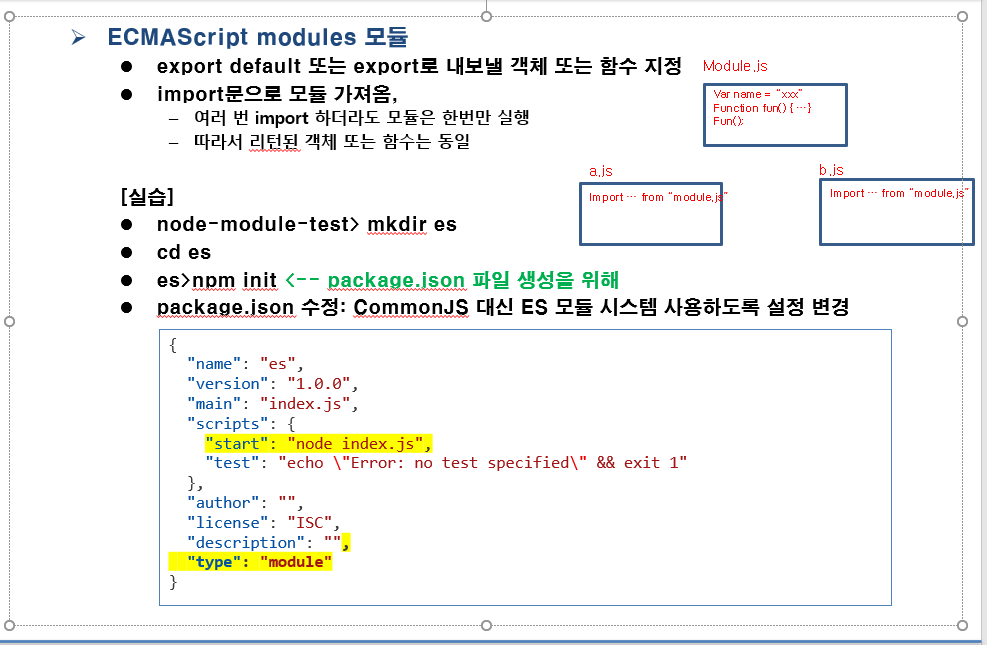
? a.js / b.js 에서 각각 모듈을 import하여 사용하게 되면 import해오는 것은 같은 객체이다.
싱글 파일 컴포넌트를 만들어보자
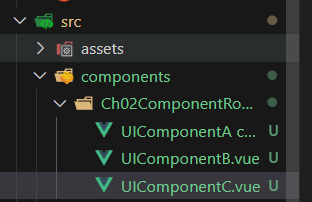
components 폴더 아래 Ch02ComponentRouting 폴더를 만들고 아래에 컴포넌트 A,B,C를 만들어보자.
<template>
    <div>
        <div class="card">
            <div class="card-header">
                UIComponentA
            </div>
            <div class="card-body">

            </div>
        </div>
    </div>
</template>

<script setup>
</script>

<style scoped></style>
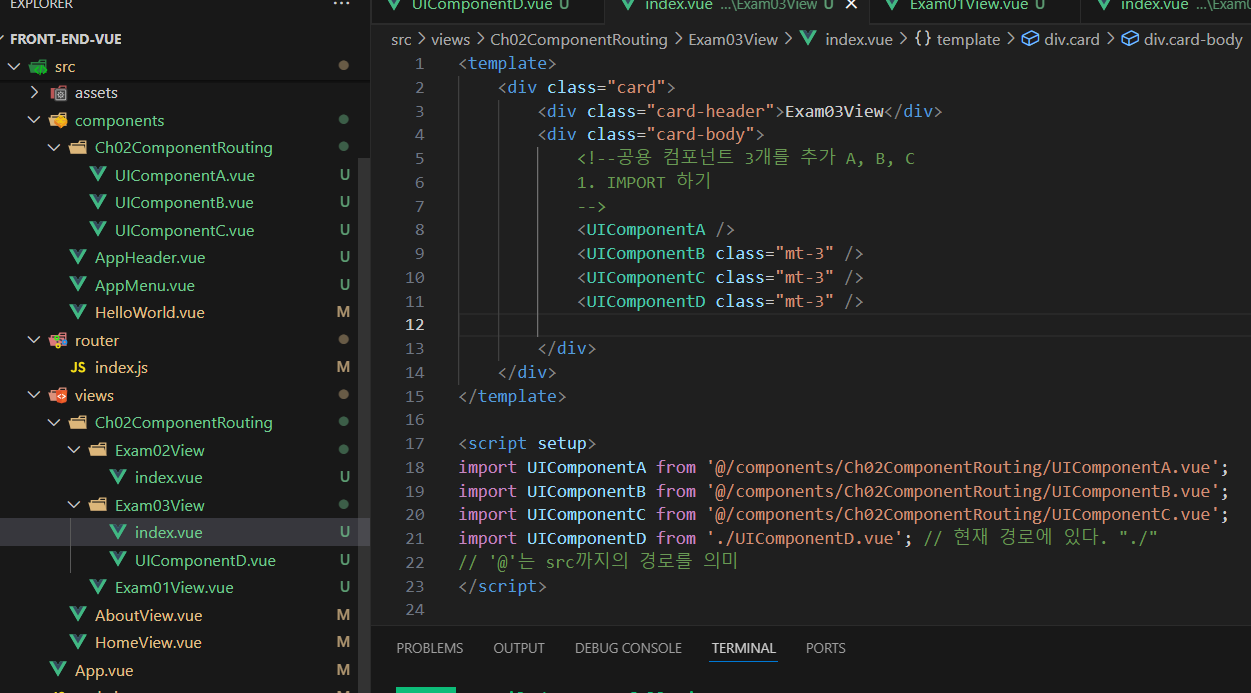
다음으로 views폴더 - Ch02ComponentRouting 폴더 - Exam03View 폴더 안에 index.vue 파일을 만든다.
<template>
    <div class="card">
        <div class="card-header">Exam03View</div>
        <div class="card-body">
            <!--공용 컴포넌트 3개를 추가 A, B, C
            1. IMPORT 하기
            -->
            <UIComponentA />
            <UIComponentB class="mt-3" />
            <UIComponentC class="mt-3" />

        </div>
    </div>
</template>

<script setup>
import UIComponentA from '@/components/Ch02ComponentRouting/UIComponentA.vue';
import UIComponentB from '@/components/Ch02ComponentRouting/UIComponentB.vue';
import UIComponentC from '@/components/Ch02ComponentRouting/UIComponentC.vue';
// '@'는 src까지의 경로를 의미
</script>

<style scoped></style>
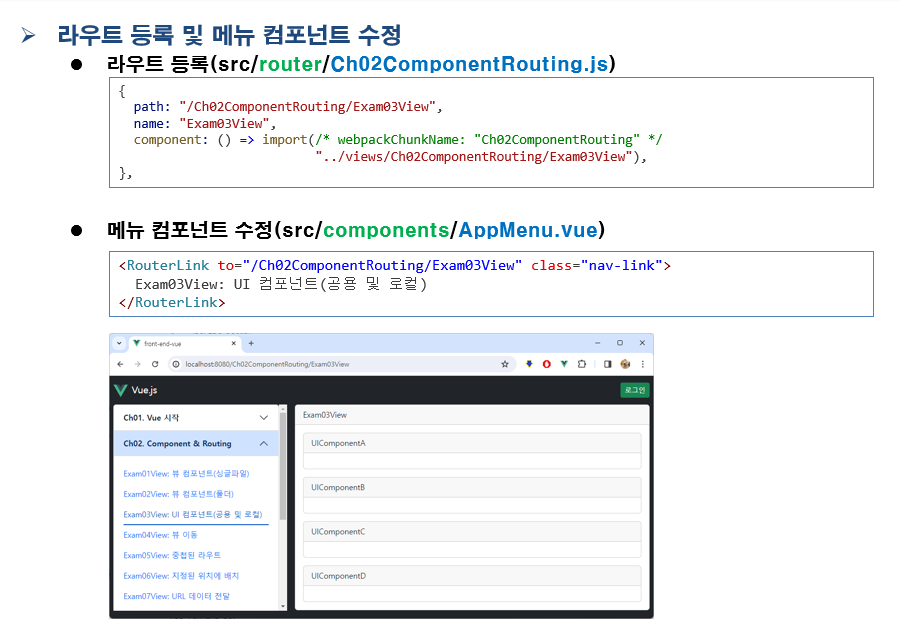
다음으로 components 폴더 밑 AppMenu.vue에 2챕터 아코디언에 리스트 하나 추가
<template>
    <div class="accordion" id="accordionExample">
        <!-- 1 --------------------------------------------------------->
        <div class="accordion-item">
            <h2 class="accordion-header">
                <button class="accordion-button fw-bold" type="button" data-bs-toggle="collapse"
                    data-bs-target="#collapse1" aria-expanded="true" aria-controls="collapse1">
                    Ch01. Vue 시작
                </button>
            </h2>
            <div id="collapse1" class="accordion-collapse collapse show" data-bs-parent="#accordionExample">
                <div class="accordion-body">
                    <ul class="nav nav-underline flex-column">
                        <li class="nav-item">
                            <RouterLink to="/" class="nav-link">Home</RouterLink>
                        </li>
                    </ul>
                </div>
            </div>
        </div>
        <!-- 2 --------------------------------------------------------->
        <div class="accordion-item">
            <h2 class="accordion-header">
                <button class="accordion-button fw-bold" type="button" data-bs-toggle="collapse"
                    data-bs-target="#collapse2" aria-expanded="true" aria-controls="collapse2">
                    Ch02. Component & Routing
                </button>
            </h2>
            <div id="collapse2" class="accordion-collapse collapse" data-bs-parent="#accordionExample">
                <div class="accordion-body">
                    <ul class="nav nav-underline flex-column">
                        <li class="nav-item">
                            <RouterLink to="/Ch02ComponentRouting/Exam01View" class="nav-link">
                                Exam01View : 뷰 컴포넌트(싱글파일)</RouterLink>
                        </li>
                        <li class="nav-item">
                            <RouterLink to="/Ch02ComponentRouting/Exam02View" class="nav-link">
                                Exam02View : 뷰 컴포넌트(폴더)</RouterLink>
                        </li>
                        <li class="nav-item">
                            <RouterLink to="/Ch02ComponentRouting/Exam03View" class="nav-link">
                                Exam03View : UI 컴포넌트(공용 및 로컬)</RouterLink>
                        </li>
                    </ul>
                </div>
            </div>
        </div>
    </div>
</template>

<script setup>

</script>

<style scoped></style>

D 파일을 만들고 import 해보자.
라우트링크는 현재 페이지에 그대로 있고, DOM 부분만 교체
a링크는 아예 다른 페이지 경로로 이동을 한다.

캐멀 스타일의 태그, 대쉬(-)를 추가한 방식이 있다.
* 캐멀 스타일로 하자.
1. 정적라우트URL 이용 방식
2. 백틱바인딩문자열 또는 객체 이용 방식 (2가지)
# 태그 링크 <RouterLink> or <router-link> 이용 방법
속성
to="컴포넌트 경로"
v-bind:to=" `경로문자열` " --> ( v-bind는 생략 가능하다 !! )
:to=" { path: '경로' }" --> 라우터 속성에 등록되어있는 path / name 을 이용할수도 있다!!
폴더형 컴포넌트를 하나 더 생성해보자 (Exam04View)
라우터 폴더 index.js에 라우트 추가
import { createRouter, createWebHistory } from 'vue-router'
import HomeView from '../views/HomeView.vue'
import AboutView from '../views/AboutView.vue'
import Exam01View from '@/views/Ch02ComponentRouting/Exam01View.vue'
import Exam02View from '@/views/Ch02ComponentRouting/Exam02View'
import Exam04view from '@/views/Ch02ComponentRouting/Exam04View'

const routes = [
  {
    path: '/',
    name: 'home',
    component: HomeView
  },
  {
    path: '/Ch02ComponentRouting/Exam01View',
    component: Exam01View
  },
  {
    path: '/Ch02ComponentRouting/Exam02View',
    // component: Exam02View
    component: () => import(/* webpackChunkName: "exam02view" */ '@/views/Ch02ComponentRouting/Exam02View')
  },
  {
    path: '/Ch02ComponentRouting/Exam03View',
    component: () => import(/* webpackChunkName: "exam02view" */ '@/views/Ch02ComponentRouting/Exam03View')
  },
  {
    path: '/Ch02ComponentRouting/Exam04View',
    component: Exam04view
  }
]

const router = createRouter({
  history: createWebHistory(process.env.BASE_URL), //히스토리 (뒤로가기 가능)
  routes
})

export default router
그리고 AppMenu.vue 코드 리스트 추가
<template>
    <div class="accordion" id="accordionExample">
        <!-- 1 --------------------------------------------------------->
        <div class="accordion-item">
            <h2 class="accordion-header">
                <button class="accordion-button fw-bold" type="button" data-bs-toggle="collapse"
                    data-bs-target="#collapse1" aria-expanded="true" aria-controls="collapse1">
                    Ch01. Vue 시작
                </button>
            </h2>
            <div id="collapse1" class="accordion-collapse collapse show" data-bs-parent="#accordionExample">
                <div class="accordion-body">
                    <ul class="nav nav-underline flex-column">
                        <li class="nav-item">
                            <RouterLink to="/" class="nav-link">Home</RouterLink>
                        </li>
                    </ul>
                </div>
            </div>
        </div>
        <!-- 2 --------------------------------------------------------->
        <div class="accordion-item">
            <h2 class="accordion-header">
                <button class="accordion-button fw-bold" type="button" data-bs-toggle="collapse"
                    data-bs-target="#collapse2" aria-expanded="true" aria-controls="collapse2">
                    Ch02. Component & Routing
                </button>
            </h2>
            <div id="collapse2" class="accordion-collapse collapse" data-bs-parent="#accordionExample">
                <div class="accordion-body">
                    <ul class="nav nav-underline flex-column">
                        <li class="nav-item">
                            <RouterLink to="/Ch02ComponentRouting/Exam01View" class="nav-link">
                                Exam01View : 뷰 컴포넌트(싱글파일)</RouterLink>
                        </li>
                        <li class="nav-item">
                            <RouterLink to="/Ch02ComponentRouting/Exam02View" class="nav-link">
                                Exam02View : 뷰 컴포넌트(폴더)</RouterLink>
                        </li>
                        <li class="nav-item">
                            <RouterLink to="/Ch02ComponentRouting/Exam03View" class="nav-link">
                                Exam03View : UI 컴포넌트(공용 및 로컬)</RouterLink>
                        </li>
                        <li class="nav-item">
                            <RouterLink to="/Ch02ComponentRouting/Exam04View" class="nav-link">
                                Exam04View : 뷰 이동</RouterLink>
                        </li>
                    </ul>
                </div>
            </div>
        </div>
    </div>
</template>

<script setup>

</script>

<style scoped></style>
ppt에 써있는 방법을 이용해보자.
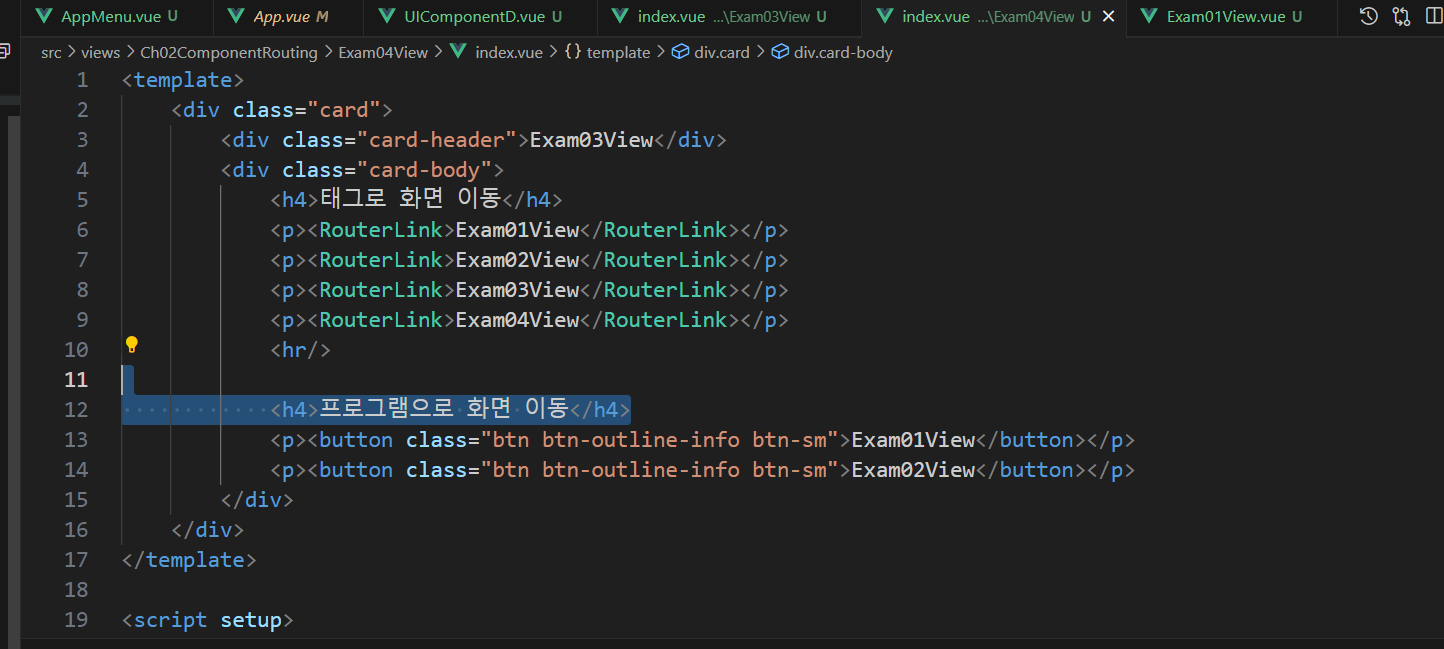
Exam04View의 index.vue
<template>
    <div class="card">
        <div class="card-header">Exam03View</div>
        <div class="card-body">
            <h4>태그로 화면 이동</h4>
            <p><RouterLink to="/Ch02ComponentRouting/Exam01View">Exam01View</RouterLink></p>
            <!-- 변수를 넣어줄 경우 유용한 방법 -->
            <p><RouterLink v-bind:to="`/Ch02ComponentRouting` + `/Exam02View`">Exam02View</RouterLink></p>
            <p><RouterLink :to="`/Ch02ComponentRouting` + `/Exam03View`">Exam03View</RouterLink></p>
            <p><RouterLink :to="{path: '/Ch02ComponentRouting/Exam04View'}">Exam04View</RouterLink></p>
            <p><RouterLink :to="{name: 'Exam01View'}">Exam01View</RouterLink></p>
            <hr/>

            <h4>프로그램으로 화면 이동</h4>
            <p><button class="btn btn-outline-info btn-sm">Exam01View</button></p>
            <p><button class="btn btn-outline-info btn-sm">Exam02View</button></p>
        </div>
    </div>
</template>

<script setup>

</script>

<style scoped></style>
<p><RouterLink :to="{name: 'Exam01View'}">Exam01View</RouterLink></p> 부분에서 name을 사용하려면
라우터에 있는 index.js에 name속성을 추가해주어야 한다.
const routes = [
  {
    path: '/',
    name: 'home',
    component: HomeView
  },
  {
    path: '/Ch02ComponentRouting/Exam01View',
    component: Exam01View,
    name: 'Exam01View'
  },
  {
    path: '/Ch02ComponentRouting/Exam02View',
    // component: Exam02View
    component: () => import(/* webpackChunkName: "exam02view" */ '@/views/Ch02ComponentRouting/Exam02View')
  },
  {
    path: '/Ch02ComponentRouting/Exam03View',
    component: () => import(/* webpackChunkName: "exam02view" */ '@/views/Ch02ComponentRouting/Exam03View')
  },
  {
    path: '/Ch02ComponentRouting/Exam04View',
    component: Exam04view
  }
]

const router = createRouter({
  history: createWebHistory(process.env.BASE_URL), //히스토리 (뒤로가기 가능)
  routes
})
# Vue.js에서는 onclick을 쓰면 안된다.
-> Vue.js에서 쓰는 태그들은 모든 코드들. 전부가 자바스크립트로 변경이 된다.
<p><button class="btn btn-outline-info btn-sm" onclick="goUrl()">Exam01View</button></p>이렇게 사용하면 안되고,
<!-- 이 코드를 사용하면 컴포넌트가 사라짐.. 왜일까? -->
<p><button class="btn btn-outline-info btn-sm" v-click="goUrl()">Exam01View</button></p>
<!-- 아래 코드들은 정상 작동한다. -->
<p><button class="btn btn-outline-info btn-sm" v-on:click="goUrl()">Exam01View</button></p>
<p><button class="btn btn-outline-info btn-sm" @click="goUrl">Exam02View</button></p>
이렇게 사용해야 한다.
Exam04View - index.vue 수정
<template>
<div class="card">
<div class="card-header">Exam04View</div>
<div class="card-body">
<h4>태그로 화면 이동</h4>
<p><RouterLink to="/Ch02ComponentRouting/Exam01View">Exam01View</RouterLink></p>
<!-- 변수를 넣어줄 경우 유용한 방법 -->
<p><RouterLink v-bind:to="'/Ch02ComponentRouting' + '/Exam01View'">Exam01View</RouterLink></p>
<p><RouterLink :to="'/Ch02ComponentRouting' + '/Exam01View'">Exam01View</RouterLink></p>
<p><RouterLink :to="{path: '/Ch02ComponentRouting/Exam01View'}">Exam01View</RouterLink></p>
<p><RouterLink :to="{name: 'Exam01View'}">Exam01View</RouterLink></p> <!--name: 라우터에 등록된 이름-->
<hr/>
<h4>프로그램으로 화면 이동</h4>
<p><button class="btn btn-info btn-sm" v-on:click="goUrl('Exam01View')">Exam01View</button></p>
<p><button class="btn btn-info btn-sm" @click="goUrl('Exam03View')">Exam03View</button></p>
</div>
</div>
</template>
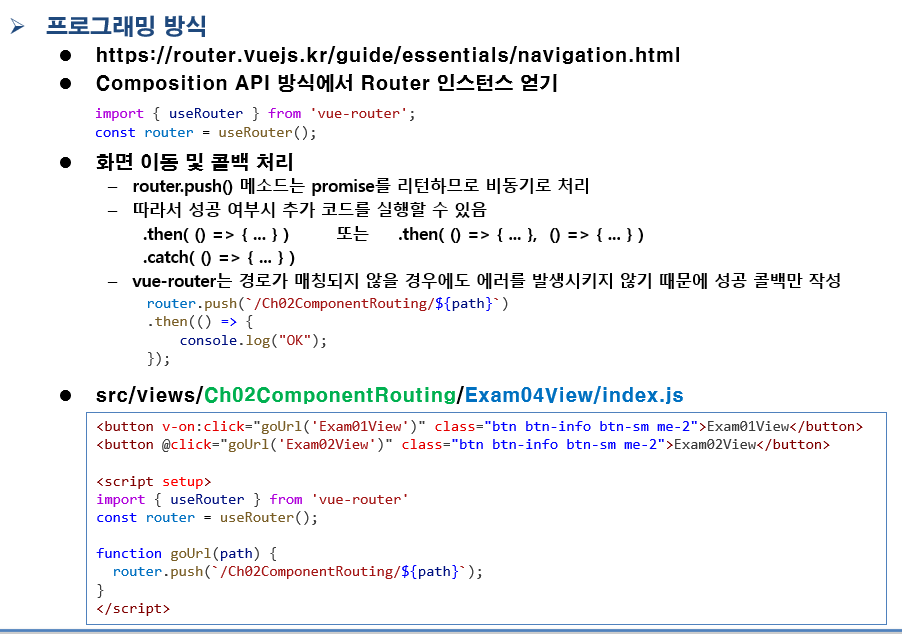
<script setup>
import { RouterLink, useRouter } from 'vue-router';
const router = useRouter(); // 라우터 객체 얻기
function goUrl(kind) {
router.push("/Ch02ComponentRouting/" + kind)
.then(() => { // then : 그리고나서. 람다식으로 조절
console.log("이동 완료"); // 이렇게 사용해야 한다.
});
//console.log("이동 완료"); // 위에서 이동을하게 되는데, 이동한 곳에 console이 먼저 출력될때가 있다.
}
</script>
<style scoped>
</style>
# Snippet 활용하기
## 윈도우 환경에서
VScode를 실행한 상태에서 'ctrl + shift + p'를 눌러 Command Palett를 실행한다. (설정키를 눌러 실행해도 무방)
Snippets:Configure User Snippets -> vue.json 으로 들어간다.
큰 중괄호 { } 안에 자신이 기본적으로 쓰고 싶은 구조를 넣을 수 있다! (템플릿, 스크립트, 스타일 구조)
이 때, 구조는 https://snippet-generator.app/?description=&tabtrigger=&snippet=&mode=vscode 스니펫 제너레이터에서 json 형식의 코드를 재구성해서 copy하여 넣자!
ex)
{
	"vue-card": {
		"prefix": "vue-card",
		"body": [
		  "<template>",
		  "    <div class=\"card\">",
		  "        <div class=\"card-header\"></div>",
		  "        <div class=\"card-body\">",
		  "",
		  "        </div>",
		  "    </div>",
		  "</template>",
		  "",
		  "<script setup>",
		  "",
		  "</script>",
		  "",
		  "<style scoped>",
		  "",
		  "</style>",
		  ""
		],
		"description": "vue-card-snippet"
	  }
}
실습해보자.
1. 뷰 폴더 아래 Ch02ComponentRouting 아래 Exam05View 폴더 생성 후 인덱스 생성
2. 라우터에 라우트 코드 추가
3. AppMenu.vue에 리스트 추가
Exam05View의 index.vue 파일
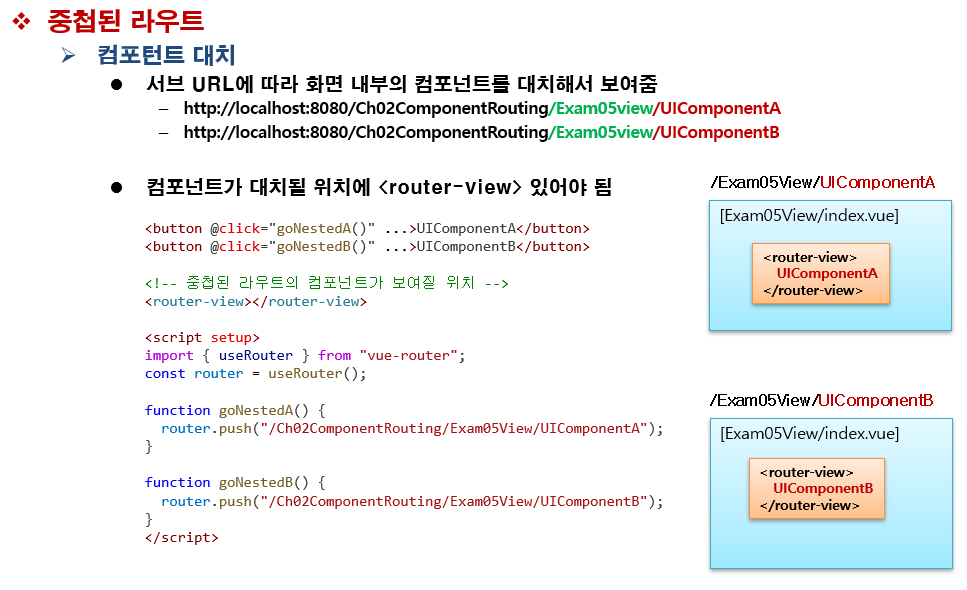
<template>
    <div class="card">
        <div class="card-header">Exam05View</div>
        <div class="card-body">
            <!-- 라우터 URL 중첩을 생각하여 to내용을 작성 -->
            <!-- 라우터가 중첩되어 URL에 표시되기 때문에 UIComponentA만 작성하면 안된다. -->
            <!-- <RouterLink to="UIComponentA" class="me-3">UIComponentA</RouterLink> -->
            <RouterLink to="/Ch02ComponentRouting/Exam05View/UIComponentA" class="me-3">UIComponentA</RouterLink>
            <RouterLink to="/Ch02ComponentRouting/Exam05View/UIComponentB" class="me-3">UIComponentB</RouterLink>
            <button class="btn btn-outline-info btn-sm" @click="changeNestedComponent()">UIComponent</button>
            <hr>
            <!-- 중첩된 라우트의 컴포넌트가 보여질 위치 -->
            <RouterView/>

        </div>
    </div>
</template>

<script setup>
import { useRouter } from 'vue-router';
const router = useRouter();

function changeNestedComponent() {
    router.push("/Ch02ComponentRouting/Exam05View/UIComponentC")
}
</script>

<style scoped>
</style>
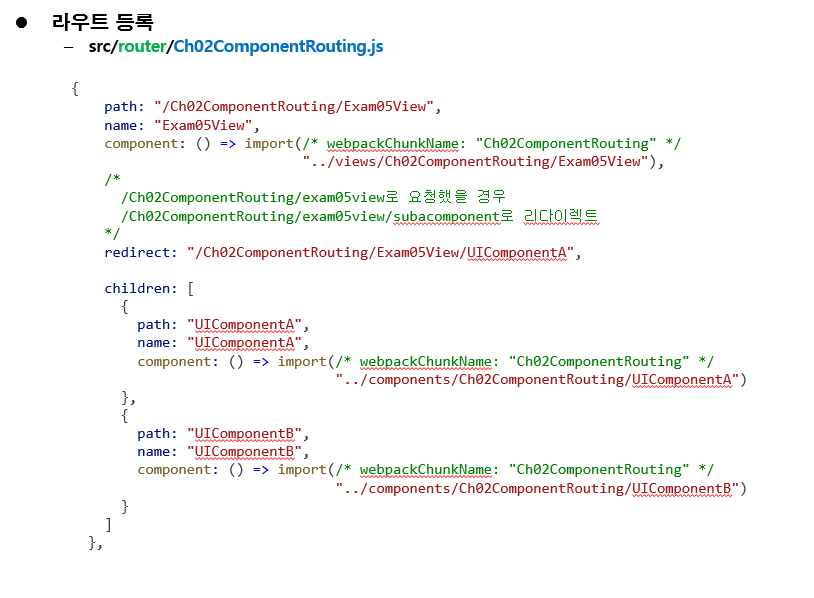
대표적인 라우트 등록을 하고 싶을 때?
라우트에서 소스코드 수정으로
'redirect' 속성을 이용하여 처음부터 UIComponentA가 클릭된 상태로 둔다.
freeboard와 blue가 데이터일 수 있다.
실습해보자.
1. Exam06 폴더 생성 - index.vue 생성
2. 라우트 등록
3. AppMenu에 리스트 추가
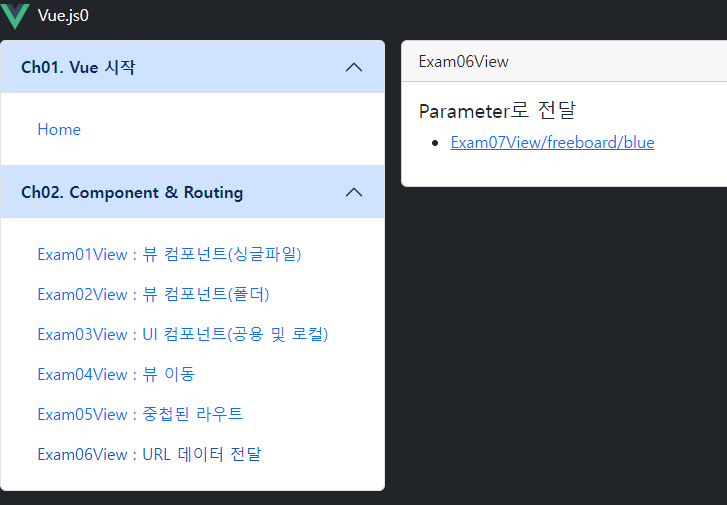
Exam06폴더 내의 index.vue
<template>
<div class="card">
<div class="card-header">Exam06View</div>
<div class="card-body">
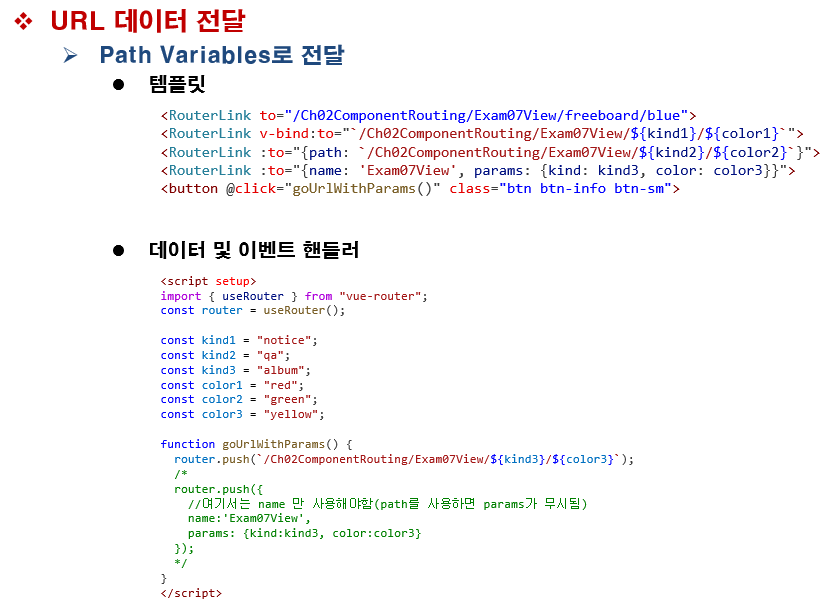
<h5>Parameter로 전달</h5>
<ul>
<li>
<RouterLink to="/Ch02ComponentRouting/Exam07View/freeboard/blue">Exam07View/freeboard/blue
</RouterLink>
</li>
</ul>
</div>
</div>
</template>
<script setup>
</script>
<style scoped>
</style>
Exam07View 폴더 생성 후 index.vue 파일 생성
라우트에 추가
콜론 (:) 이 들어가게되면 이것은 "데이터"란 의미이다.
따라서 위의 코드에서
'/freeboard/blue' 는
라우터에 등록된 path 속성의 '/:kind?/:color?/' 부분과 매칭이된다!
# 보내는 쪽 : useRouter 모듈을 사용하여 값을 보내고,
# 받는 쪽 : useRoute 모듈을 사용하여 값을 받아 사용할 수 있다!
받는 쪽에서 ex) {{ route.params.kind }} or {{ route.params.color }} 이런식으로 값을 나타낼 수 있다.

물음표 (?) 는 경로를 뜻하지만 없어도 된다.
# 여기서 Exam07View에서 데이터를 어떻게 받을 수 있을까?
<template>
    <div class="card">
        <div class="card-header">Exam07View</div>
        <div class="card-body">
            <h5>경로 변수(파라미터 : Parameter)로 전달</h5>
            <p>전달된 게시판 종류: {{ route.params.kind }}</p>
            <p>전달된 색상: {{ route.params.color}}</p>

            <h5 class="mt-5">쿼리 스트링으로 전달된 데이터</h5>
            <p>전달된 게시판 종류: {{ route.query.kind }}</p>
            <p>전달된 색상: {{ route.query.color}}</p>
        </div>
    </div>
</template>

<script setup>
// useRouter는 라우트하는 (데이터가 이동할 때) 해당 객체를 의미함
// useRoute는 이동할 때 전달되는 데이터를 찾을 때 사용
import { useRoute } from 'vue-router';
const route = useRoute();

console.log(route.params.kind);
console.log(route.params.blue);
console.log(route.query.kind);
console.log(route.query.blue);

</script>

<style scoped>
</style>
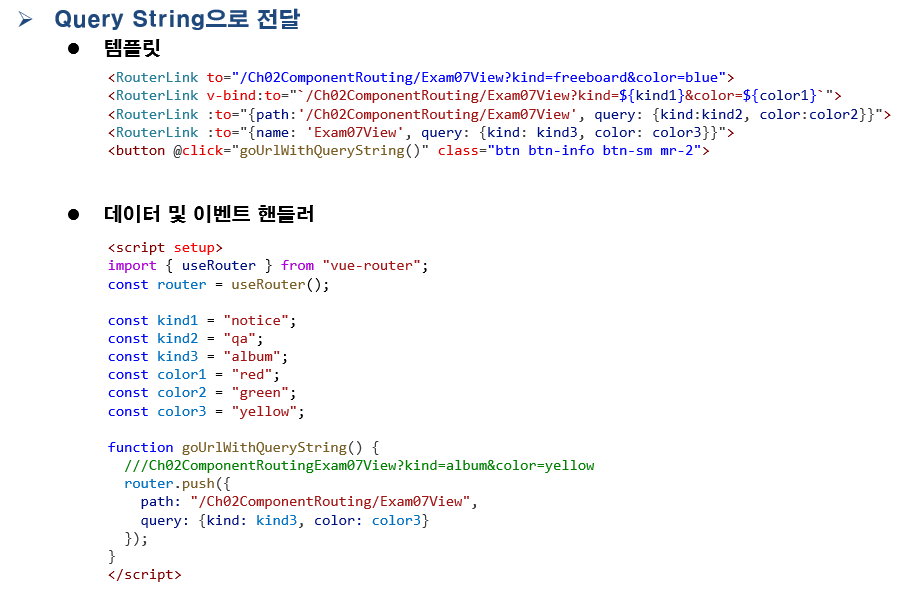
# 쿼리 스트링(Query String)이란?
https://velog.io/@pear/Query-String-%EC%BF%BC%EB%A6%AC%EC%8A%A4%ED%8A%B8%EB%A7%81%EC%9D%B4%EB%9E%80
# Exam06View - index.vue
<template>
    <div class="card">
        <div class="card-header">Exam06View</div>
        <div class="card-body">
            <h5>경로 변수(파라미터 : Parameter)로 전달</h5>
            <ul>
                <li>
                    <RouterLink to="/Ch02ComponentRouting/Exam07View/freeboard/blue">Exam07View/freeboard/blue</RouterLink>
                </li>
                <li>
                    <button class="btn btn-outline-info btn-sm" @click="goUrlWithParams()">
                        Exam07View/freeboard/blue
                    </button>
                </li>
            </ul>

            <h5>쿼리 스트링으로 전달된 데이터</h5>
            <ul>
                <li>
                    <RouterLink to="/Ch02ComponentRouting/Exam07View?kind=notice&color=red">Exam07View?kind=notice&color=red</RouterLink>
                </li>
                <li>
                    <button class="btn btn-outline-info btn-sm" @click="goUrlWithQueryString()">
                        Exam07View?kind=notice&color=red
                    </button>
                </li>
            </ul>
        </div>
    </div>
</template>

<script setup>
import { useRouter } from 'vue-router';
const router = useRouter();

// var const let 상관없음
let kind1 = "freeboard";
let color1 = "blue";
let kind2 = "notice";
let color2 = "red";

function goUrlWithParams() {
    // router.push("/Ch02ComponentRouting/Exam07View/freeboard/blue");
    // router.push("/Ch02ComponentRouting/Exam07View/" + kind1 + "/" + color1);
    router.push(`/Ch02ComponentRouting/Exam07View/${kind1}/${color1}`);
}

function goUrlWithQueryString() {
    // router.push("/Ch02ComponentRouting/Exam07View?kind=notice&color=red");
    // router.push("/Ch02ComponentRouting/Exam07View?kind=" + kind2 + "&" + "color=" + color2);
    router.push(`/Ch02ComponentRouting/Exam07View?kind=${kind2}&color=${color2}`);
}
</script>

<style scoped></style>
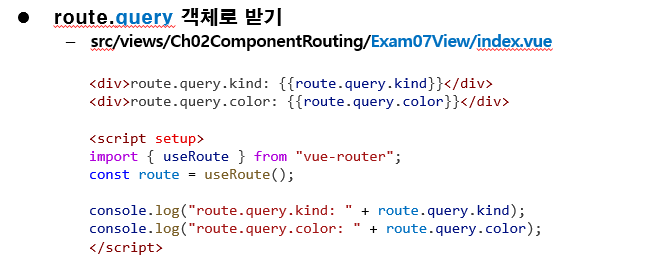
# Exam07View - index.vue
<template>
    <div class="card">
        <div class="card-header">Exam07View</div>
        <div class="card-body">
            <h5>경로 변수(파라미터 : Parameter)로 전달</h5>
            <p>전달된 게시판 종류: {{ route.params.kind }}</p>
            <p>전달된 색상: {{ route.params.color}}</p>

            <h5 class="mt-5">쿼리 스트링으로 전달된 데이터</h5>
            <p>전달된 게시판 종류: {{ route.query.kind }}</p>
            <p>전달된 색상: {{ route.query.color}}</p>
        </div>
    </div>
</template>

<script setup>
// ???
// useRouter는 라우트하는 (데이터가 이동할 때) 해당 객체를 의미함
// useRoute는 이동할 때 전달되는 데이터를 찾을 때 사용
import { useRoute } from 'vue-router';
const route = useRoute();

console.log(route.params.kind);
console.log(route.params.blue);
console.log(route.query.kind);
console.log(route.query.blue);

</script>

<style scoped>
</style>
★ 헷갈리는 것들..
단순한 경로의 매개값으로 받는 경우..
ex)
route 모듈을 import하여 'route.params.매개변수명' 으로 사용
쿼리 스트링의 형식으로 매개값을 받는 경우..
ex)
route 모듈을 import하여 'route.query.매개변수명' 으로 사용
==> 여기서 매개변수명은 router에 등록되어있는 path에 등록되어 있는 변수명을 사용해야한다!!!
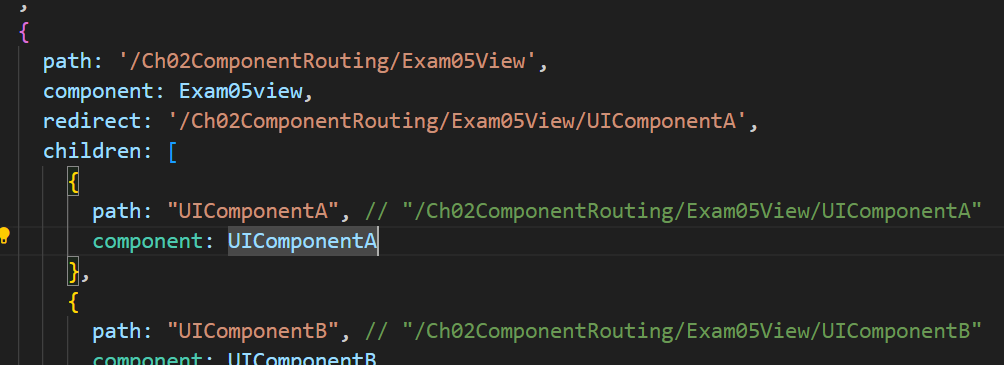
router - Ch02ComponentRouting.js 소스의 일부분
즉, kind, color를 사용해야함.
ex) route.params.kind / route.query.kind
# Exam06View - index.vue (최종)
<template>
    <div class="card">
        <div class="card-header">Exam06View</div>
        <div class="card-body">
            <h5>경로 변수(파라미터 : Parameter)로 전달</h5>
            <ul>
                <li>
                    <RouterLink to="/Ch02ComponentRouting/Exam07View/freeboard/blue">Exam07View/freeboard/blue</RouterLink>
                </li>
                <li>
                    <RouterLink :to="`/Ch02ComponentRouting/Exam07View/${kind1}/${color1}`">Exam07View/${kind1}/${color1}</RouterLink>
                </li>
                <li>
                    <RouterLink :to="`/Ch02ComponentRouting/Exam07View/${kind1}/${color1}`">Exam07View/{{kind1}}/{{color1}}</RouterLink>
                </li>
                <li>
                    <button class="btn btn-outline-info btn-sm" @click="goUrlWithParams()">
                        Exam07View/freeboard/blue
                    </button>
                </li>
            </ul>

            <h5>쿼리 스트링으로 전달된 데이터</h5>
            <ul>
                <li>
                    <RouterLink to="/Ch02ComponentRouting/Exam07View?kind=notice&color=red">Exam07View?kind=notice&color=red</RouterLink>
                </li>
                <li>
                    <RouterLink :to="`/Ch02ComponentRouting/Exam07View/${kind2}/${color2}`">Exam07View/${kind2}/${color2}</RouterLink>
                </li>
                <li>
                    <RouterLink :to="`/Ch02ComponentRouting/Exam07View?kind=${kind2}&color=${color2}`">Exam07View?kind={{kind2}}&{{color2}}</RouterLink>
                </li>
                <li>
                    <button class="btn btn-outline-info btn-sm" @click="goUrlWithQueryString()">
                        Exam07View?kind=notice&color=red
                    </button>
                </li>
            </ul>
        </div>
    </div>
</template>

<script setup>
import { useRouter } from 'vue-router';
const router = useRouter();

// var const let 상관없음
let kind1 = "freeboard";
let color1 = "blue";
let kind2 = "notice";
let color2 = "red";

function goUrlWithParams() {
    // router.push("/Ch02ComponentRouting/Exam07View/freeboard/blue");
    // router.push("/Ch02ComponentRouting/Exam07View/" + kind1 + "/" + color1);
    router.push(`/Ch02ComponentRouting/Exam07View/${kind1}/${color1}`);
}

function goUrlWithQueryString() {
    // router.push("/Ch02ComponentRouting/Exam07View?kind=notice&color=red");
    // router.push("/Ch02ComponentRouting/Exam07View?kind=" + kind2 + "&" + "color=" + color2);
    router.push(`/Ch02ComponentRouting/Exam07View?kind=${kind2}&color=${color2}`);
}
</script>

<style scoped></style>
# 스크립트에서 router와 route
router : 이동하는게 목적이 아닌, 이동하고 나서 데이터를 얻는 게 목적임
route : 데이터를 얻는 목적이라면 useRoute
Exam07View 에서는 데이터를 전달 받게 됨.
Exam06View 에서는 데이터를 전달 하는 목적
'JAVA' 카테고리의 다른 글
| 62일차 2024-05-28 (Vue 6일차) (0) | 2024.05.28 |
|---|---|
| 60일차 2024-05-24 (Vue 4일차) (0) | 2024.05.24 |
| 58일차 2024-05-22 (Vue 2일차) (0) | 2024.05.22 |
| 43일 2024-04-26 (0) | 2024.04.26 |
| 42일차 2024-04-25 (1) | 2024.04.25 |